top button
Flag Notify
    Connect to us
      Site Registration

Site Registration

Use Global Ajax Event Handler Methods In JQuery

+4 votes
236 views

Now a days many ASP.NET applications use jQuery Ajax in one or the other way. jQuery methods such as $.ajax(), $.get() and $.post() are commonly used in such applications. When you make multiple Ajax calls from a single page you may take advantage of the global Ajax event handler methods of jQuery. To that end this article provides a quick reference of various global Ajax configuration methods that can simplify your jQuery code.

As an example you will call the following ASP.NET MVC actions from jQuery code:

public ActionResult GetData()
{
    System.Threading.Thread.Sleep(4000);
    return Json($"Server timestamp : {DateTime.Now}");
}

The GetData() action simply asks the current thread to sleep for 4 seconds and then returns server side date-time stamp to the caller.

To invoke the above action you can use $.ajax() method as shown below:

$.ajax({
    url: "/home/getdata",
    type: "GET",
    dataType: "json",
    success: function (msg) {
        $("#response").html(msg);
    }
});

The success callback simply displays the timestamp returned from the server into a response <div> element. It is also assumed that the page contains an animated GIF image with ID of progress.

  Ok. Now, let's use some global Ajax event handler methods of jQuery to configure things such as progress indicator and error message.

.ajaxSend()

The ajaxSend() method is used to execute some code just before making an Ajax request. You can use this method to display a common progress indicator to all the Ajax requests arising from a page. The following code shows how .ajaxSend() can be used:

$(document).ajaxSend(function () {
    $("#progress").show();
});

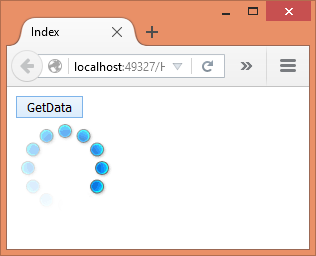
As you can see, the ajaxSend() method is called on the document selector and takes a callback function. The callback function is triggered just before making each Ajax request from the page. For example, if a page makes three Ajax requests, the callback function gets executed thrice. In this case the callback function simply shows a progress indicator in the form of an animated GIF.

The following figure shows a sample run of the above code. 

image

.ajaxComplete()

The ajaxComplete() method is used to execute some code when an Ajax request completes - successfully or with error. You can use this method to hide the progress indicator shown using the ajaxSend() method. The following code shows the usage of this method:

$(document).ajaxComplete(function () {
    $("#progress").hide();
});

Just like ajaxSend(), the ajaxComplete() method is also called on the document selector. In this case the callback function simply hides the progress indicator.

.ajaxStart()

The callbacks registered through the ajaxSend() and ajaxComplete() methods are called for each and every Ajax request being invoked from the page. This is fine when your code makes only one Ajax request at a time. Imagine a case where you have multiple Ajax requests being made at the same time (or within a same time window). If you use ajaxSend() in this case, the show() method will be called even if the progress indicator is already visible from the previous call. You can correct the behavior if you show the progress indicator only when the first ever Ajax request is made. That's where ajaxStart() method comes handy.

$(document).ajaxStart(function () {
    $("#progress").show();
});

When an Ajax request is being sent, jQuery checks whether there are any other pending requests from the page. If there are no pending Ajax requests the ajaxStart() callback is triggered.

.ajaxStop()

The counterpart of ajaxStart() is ajaxStop(). The callback registered through ajaxStop() is called whenever all the Ajax requests complete. When an Ajax request completes jQuery checks whether there are any other pending requests. If there are no pending requests jQuery triggers the ajaxStop() callback. The following code shows its usage:

$(document).ajaxStop(function () {
    $("#progress").hide();
});

.ajaxSuccess()

The ajaxSuccess() method is used to perform some work when an Ajax request completes successfully. Notice the difference between ajaxComplete() and ajaxSuccess(). The ajaxComplete() callback is triggered irrespective of whether an Ajax request was successful or not. The ajaxSuccess(), on the other hand, is called only if an Ajax request is successful.

$(document).ajaxSuccess(function () {
    $("#status").html(
     "The Ajax request was completed successfully!");
});

.ajaxError()

The ajaxError() method is used to perform some work when an Ajax request completes with some error. You may use this method to display error indicator or to do some cleanup.

$(document).ajaxError(function () {
    $("#status").html(
    "There was an error while executing the Ajax request!");
});

Summary

  • ajaxSend() triggers a registered callback every time an Ajax request is sent.
  • ajaxComplete() triggers a registered callback every time an Ajax request completes.
  • ajaxSuccess() triggers a registered callback every time an Ajax request completes successfully.
  • ajaxError() triggeres a registered callback every time an Ajax request completes with an error.
  • ajaxStart() triggers a registered callback when the first Ajax request begins.
  • ajaxStop() triggers a registered callback when all the Ajax requests complete.
posted Oct 24, 2016 by Shivaranjini

  Promote This Article
Facebook Share Button Twitter Share Button LinkedIn Share Button


Related Articles

In data entry forms involving textboxes with predictable values one can use autocomplete to assist user pick an existing value. HTML5 introduces <datalist> element that can come handy while implementing autocomplete. The <datalist> element holds a list of options and can be attached with a textbox using list attribute. By adding a bit of jQuery Ajax you can dynamically populate the options in a <datalist>. This article shows you how to do just that.

HTML5 <datalist> element is used as shown in the following markup.

<input type="text" list="datalist1" />

<datalist id="datalist1">
  <option value="US" label="United States" />
  <option value="UK" label="United Kingdom" />
  <option value="IN" label="India" />
</datalist>

At runtime the above markup shows an autocomplete as shown below:

image

Once you select an option from the list, the textbox is filled with the value. The <datalist> and its <option> elements are statically placed in the above markup. If you wish to dynamically populate the <datalist> based on the value entered in the textbox, you need to make an Ajax call to the server and fetch the required data.

Consider the following HTML markup that has a textbox and an empty <datalist>.

<h1>Autocomplete Example</h1>
<input id="companyName" list="companyList" />
<datalist id="companyList"></datalist>

To dynamically populate the <datalist> you can add the following jQuery code:

$(document).ready(function () {
    $("#companyName").on("input", function () {
        var options = {};
        options.url = "/home/getcompanylist";
        options.type = "GET";
        options.data = { "criteria": $("#companyName").val() };
        options.dataType = "json";
        options.success = function (data) {
            $("#companyList").empty();
            for(var i=0;i<data.length;i++)
            {
                $("#companyList").append("<option value='" + 
                data[i].CompanyName + "'></option>");
            }
        };
        $.ajax(options);
    });

});

The above jQuery code wires the input event handler for the companyName textbox. The code makes an Ajax call to an MVC action method - GetCompanyList(). This action method returns a list of CompanyName values from Customers table of the Northwind database. While making the Ajax call you pass the textbox value to the action method as the search criteria. The success function receives an array of JavaScript objects. Each object has a single property - CompanyName - that is then filled in <option> elements of companyList.

The GetCompanyList() action method finds all the company names containing the entered text. The GetCompanyList() action is shown below:

public JsonResult GetCompanyList(string criteria)
{
    NorthwindEntities db = new NorthwindEntities();
    var query = (from c in db.Customers
                    where c.CompanyName.Contains(criteria)
                    orderby c.CompanyName ascending
                    select new { c.CompanyName }).Distinct();
    return Json(query.ToList(),JsonRequestBehavior.AllowGet);
}

Notice that GetCompanyList() action returns JsonResult using Json() method. Also notice that JsonRequestBehavior is set to AllowGet so that GET requests can call this method.

That's it! You can now run the application and test whether it dynamically displays the autocomplete. The following figure shows a sample run.

image

READ MORE

Sometimes you need to select records for certain action using checkboxes. For example, you may select records for deleting and then delete them from the database. Consider the following screen shot that shows such an example in action.

image

As you can see there are two ways to select records for deletion:

  • You select checkboxes for rows to be deleted individually.
  • You can check the checkbox placed in the header row to select all the rows. This checkbox toggles the checked state of the other checkboxes.

Once selected you can click on the Delete Selected Customers button to actually delete the records.

Implementing such a functionality is straightforward using ASP.NET MVC, jQuery and Ajax. Let's see how.

As an example we will use Customers table of the Northwind database for this example. You will need to create a model class for the Customers table using EF code first. The Customer class is shown below:

public partial class Customer
{
    [StringLength(5)]
    public string CustomerID { get; set; }

    [Required]
    [StringLength(40)]
    public string CompanyName { get; set; }

    [StringLength(30)]
    public string ContactName { get; set; }

    [StringLength(30)]
    public string ContactTitle { get; set; }

    [StringLength(60)]
    public string Address { get; set; }

    [StringLength(15)]
    public string City { get; set; }

    [StringLength(15)]
    public string Region { get; set; }

    [StringLength(10)]
    public string PostalCode { get; set; }

    [StringLength(15)]
    public string Country { get; set; }

    [StringLength(24)]
    public string Phone { get; set; }

    [StringLength(24)]
    public string Fax { get; set; }
}

The NorthwindDbContext - the DbContext of our model - is shown below:

public partial class NorthwindDbContext : DbContext
{
    public NorthwindDbContext()
        : base("name=NorthwindDbContext")
    {
    }

    public virtual DbSet<Customer> Customers { get; set; }

    protected override void OnModelCreating
                (DbModelBuilder modelBuilder)
    {
        modelBuilder.Entity<Customer>()
            .Property(e => e.CustomerID)
            .IsFixedLength();
    }
}

Notice that the NorthwindDbContext assumes that the database connection string is stored in web.config with a name of NorthwindDbContext.

Now add HomeController and write Index() and Delete() actions as shown below:

public ActionResult Index()
{
    using (NorthwindDbContext db = 
                  new NorthwindDbContext())
    {
        var query = from c in db.Customers
                    select c;
        return View(query.ToList());
    }
}

public ActionResult Delete(string[] customerIDs)
{
    using (NorthwindDbContext db = 
                        ew NorthwindDbContext())
    {
        foreach (string customerID in customerIDs)
        {
            Customer obj = db.Customers.Find(customerID);
            db.Customers.Remove(obj);
        }
        db.SaveChanges();
        return Json("All the customers 
                     deleted successfully!");
    }
}

The code from the Index() action simply picks all the customers from the Customers table and passes them to the Index view for display.

The Delete() action takes a single parameter - array of CustomerIDs to be deleted. The Delete() action will be called through client side jQuery code and while calling the array will be passed to it. The Delete() action simply iterates through the customerIDs array and one-by-one deletes the customers from the database. Finally, a success message is sent back to the caller in JSON format.

Now add Index view and also add a <script> reference to the jQuery library. Then add the following markup in the Index view.

@model List<SelectAllDeleteDemo.Models.Customer>
...
...
<body>
    <h1>List of Customers</h1>
    <input type="button" id="delete" 
         value="Delete Selected Customers" />
    <br /><br />
    <table border="1" cellpadding="10">
        <tr>
            <th><input type="checkbox" id="checkAll"/></th>
            <th>CustomerID</th>
            <th>CompanyName</th>
            <th>Country</th>
        </tr>
        @foreach(var item in Model)
        {
            <tr>
                <td><input type="checkbox" class="checkBox" 
                     value="@item.CustomerID" /></td>
                <td>@item.CustomerID</td>
                <td>@item.CompanyName</td>
                <td>@item.Country</td>
            </tr>
        }
    </table>
</body>
...

Notice a few things about this markup:

  • The customer data - CustomerID, CompanyName and Country - is displayed in a table.
  • The header row contains a checkbox whose ID is checkAll
  • Each table row contains a checkbox whose class attribute is set to checkBox. And its value is set to the CustomerID of that row.
  • The button above the table is used to initiate the delete operation and its ID is delete.

Now add a <script> block and write the following jQuery code:

$(document).ready(function () {

    $("#checkAll").click(function () {
        $(".checkBox").prop('checked', 
            $(this).prop('checked'));
    });

    $("#delete").click(function () {
        var selectedIDs = new Array();
        $('input:checkbox.checkBox').each(function () {
            if ($(this).prop('checked')) {
                selectedIDs.push($(this).val());
            }
        });

        var options = {};
        options.url = "/home/delete";
        options.type = "POST";
        options.data = JSON.stringify(selectedIDs);
        options.contentType = "application/json";
        options.dataType = "json";
        options.success = function (msg) {
            alert(msg);
        };
        options.error = function () {
            alert("Error while deleting the records!");
        };
        $.ajax(options);

    });
});

The code wires click event handlers for the checkAll checkbox and the delete button. The click event handler of the checkAll checkbox toggles the checked state of all the checkboxes. This is done by selecting the checkboxes using the jQuery class selector. The checkboxes whose class attribute is checkBox are matched and their checked property is toggled. Notice the use of prop() method to do this.

The click event handler of the delete button declares an array variable to store the selected CustomerIDs. It then selects all the checkboxes with CSS class of checkBox. The each() method iterates through these checkboxes. If a checkbox is checked its value is pushed into the array. This way we get all the CustomerIDs into the selectedIDs array. The success callback simply displays the success message returned from the Delete() action.

Then options object is created to hold all the Ajax configuration properties. Notice that url property points to the Delete() action and data property holds the JSON version of the selectedIDs array. Finally, $.ajax() is used to make the Ajax call.

That's it! Run the application and test the functionality.

READ MORE
...