top button
Flag Notify
    Connect to us
      Site Registration

Site Registration

Introduction To JQuery For ASP.NET Developers

0 votes
341 views

If you are keeping yourself updated with the latest in the .NET sphere, you are probably aware that Microsoft has provided an inbuilt support for jQuery in Visual Studio 2010. Though it was possible to use jQuery with ASP.NET even before VS 2010, formally including jQuery as a part of website created using VS2010 means that more and more developers are going to learn and use it. If you haven't tried jQuery yet this article series will teach you everything needed to master jQuery and use it in ASP.NET applications.

What is jQuery?

The official website for jQuery defines jQuery as follows:

"jQuery is a fast and concise JavaScript Library that simplifies HTML document traversing, event handling, animating, and Ajax interactions for rapid web development. jQuery is designed to change the way that you write JavaScript."

Let's try to understand this description of jQuery in a bit detail.

jQuery is a JavaScript library

As a ASP.NET developer you must have used JavaScript in one way or the other. The standard JavaScript no doubt helps you code rich and responsive web pages but the amount of code that you need to write is often too much. For example, if you wish to write a fancy popup menu from ground up using JavaScript it might be a time consuming task. To simplify such development and make you more productive several JavaScript libraries are available and jQuery is one of them. There are others such as Mootools, Prototype and Dojo. The fact that Microsoft is supporting jQuery in its products and investing resources into it clearly indicates its popularity. As you would expect jQuery is cross-browser and supports all leading browsers including IE 6+, FF 2+, Chrome, Safari 3+ and Opera 9+.

jQuery is fast and concise

jQuery is highly optimized library. Moreover it is compact. The production version of jQuery 1.4.3 is just 26 KB and development version 179 KB. This compactness means less data to be downloaded at client side without compromising stunning UI effects.

Scope of jQuery

jQuery simplifies HTML DOM navigation considerably. For example, document.getElementById("Text1") becomes just $("#Text1"). Simple. Isn't it? Most of the JavaScript functionality goes in client side event handlers. jQuery is handy when it comes to event handling. If you are thinking about your AJAX functionality don't worry. jQuery allows you to make AJAX calls to ASP.NET Web Services, WCF services or even page methods. If needed jQuery can be used along with ASP.NET AJAX.

jQuery is designed to change the way that you write JavaScript

That's true! jQuery dramatically changes the way you write JavaScript code. Initially you may find syntax of jQuery bit odd but once you get hang of it you will probably never look at any other library (or at least to the traditional way of writing JavaScript). For example, a common JavaScript file contains too many small to huge functions and you keep calling them individually whenever required. With jQuery the "chain" of operations makes your code compact and handy. 

Ok. Enough of introduction. Now, let's complete the "hello world" ritual :-) In next section you will build a simple ASP.NET webform with some server controls on it that perform a trivial job of displaying "Hello world".

Download jQuery

Before you start any development with jQuery you need to download its latest version. You can do so by visiting http://jquery.com and then downloading "Development" version. If you are using VS2010 then you need not download anything because when you create a new website by default jQuery library is already added for you (see screenshot below)

image

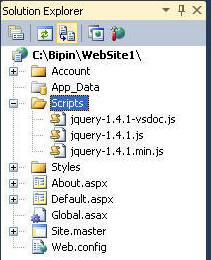
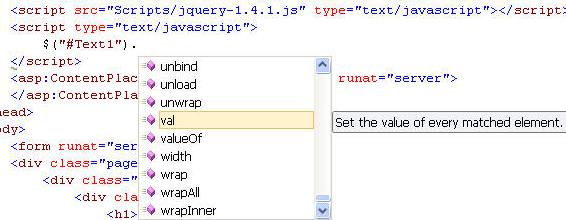
In the above screenshot jquery-1.4.1.js is the development version, jquery-1.4.1.min.js is minified production version and jquery-1.4.1-vsdoc.js is the VS2010 IntelliSense file that enables IntelliSense for jQuery (see below).

image

In the remainder of this article I will be using VS2008. If you are using VS2010 then just cleanup the default website by removing master page and other unwanted stuff.

Design a simple web form

Create a new website in VS2008 and create a new folder named Scripts. Copy the downloaded jQuery file in the Scripts folder. Though you can place it anywhere inside your website it is recommended to keep all JavaScript files under one folder typically named Scripts. The default name for the jQuery file is jquery-1.4.3.js but you can change it to something else if you so wish.

Now open the default web form and add a <script> tag in its <head> section as shown below :

<script src="Scripts/jquery-1.4.3.js" type="text/javascript"></script>

Now place a TextBox and a Button web control on the web form. Switch back to HTML source view and add another <script> block as shown below:

<script type="text/javascript">

$(document).ready(OnPageReady);

function OnPageReady() 
{
  $("#Button1").click(OnButtonClick)
}

function OnButtonClick(event) 
{
  alert("Hello world from jQuery!");
  event.preventDefault();
}
</script>

The first line is where jQuery magic starts. The $ sign is a shortcut to base object jQuery. So, $(...) is actually same as jQuery(...). If you ever coded in ASP.NET AJAX this concept should be familiar to you. The ready() is an event that fires when the wen page under consideration is fully loaded and its various elements are ready to be accessed. The event handler for ready event is supplied in the parenthesis as OnPageReady. OnPageReady() is a normal JavaScript function that wires an event handler for the client side click event of the button. It does so again by using $ shortcut. This time, however, ID of the button control is specified prefixing it with #. The click is an event and you specify its handler as OnButtonClick. The event handler receives an event object giving more information about the event. The OnButtonClick() is another function that simply displays "Hello World from jQuery!" using JavaScript alert. The OnButtonClick function also calls event.preventDefault() method so as to prevent web form postback that normally would have happened due to Button web server control.

Ok. If you run the web form you should see something like this :
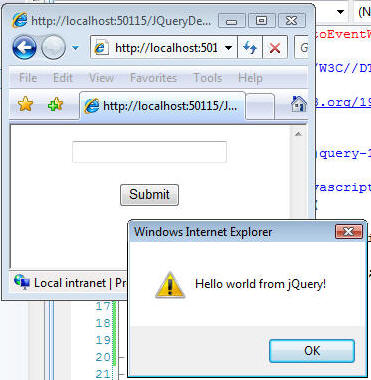
image

Easy! Isn't it?

Now let's modify the above code as shown below:

$(document).ready(
 function() {
   $("#Button1").click(function(event) {
    alert("Hello world from jQuery!");
    event.preventDefault();
   }
  )
 }
)

This is a compact version of the code that achieves the same functionality. Here, instead of defining separate functions you have written all the code there itself. You may compare this code with anonymous methods of C#.

Adding something more...

Now that the "Hello world" ritual is over let's add some extra features to our code. Begin by defining the following CSS class in your web form:

    <style type="text/css">
        .NoFocus
        {
            background-color:White;
            border:solid 1px gray;
        }

        .Focus
        {
            background-color:silver;
            border:solid 3px gray;
        }

    </style>

The CSS class NoFocus will be applied to the textbox when it doesn't have focus whereas CSS class Focus will be applied when the textbox receives the focus. To accomplish this change the preceding code (compact version) as shown below:

        $(document).ready
        (
            function() 
            {
                $("#Button1").click(
                function(event) 
                {
                    alert($("#TextBox1").val());
                    return false;
                }
                )
                
                ,
                $("#TextBox1").addClass("NoFocus")
                ,
                $("#TextBox1").focus(
                function(event)
                {
                   $("#TextBox1").removeClass("NoFocus");
                   $("#TextBox1").addClass("Focus");
                }
                ),
                
                $("#TextBox1").blur(
                function(event)
                {
                   $("#TextBox1").removeClass("Focus");
                   $("#TextBox1").addClass("NoFocus");
                }
                )
            }
        )

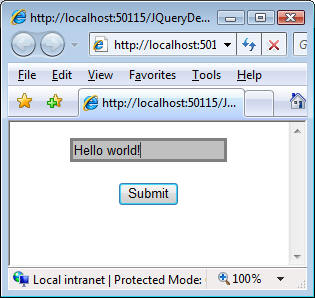
Notice the lines marked in bold letters. The click event handler of the button now displays whatever has been entered in the textbox. To retrieve textbox value you use val() method. Initially the textbox won't have focus and its CSS class should be NoFocus. This is done using addClass() method. The focus() and blur() event handlers simply add and remove the appropriate classes using addClass() and removeClass() methods respectively.

The following figure shows a sample run of the web page with the modified code. 

image

That's all for this part. In the next part you will learn about jQuery Selectors and how to use their power while selecting certain elements from a web page.

posted Nov 19, 2016 by Shivaranjini

  Promote This Article
Facebook Share Button Twitter Share Button LinkedIn Share Button


Related Articles

In the previous article you learnt to create a Web API using ASP.NET Core. A Web API can be consumed by local clients or remote clients. Local clients are the clients that are housed in the same web application as the Web API. Remote clients are the clients that are not part of the Web API application.

As far as web applications are concerned a typical local client takes a form of jQuery (or JavaScript) Ajax driven user interface that consumes the Web API. For example, consider a simple page shown below:

image

The above client to the CustomerService Web API consists of a dropdown list and four textboxes. The dropdown list contains a list of existing CustomerIDs. Selecting a CustomerID populates the other textboxes with the respective values. You can then modify the values and click on Update button to save the changes. To insert a new Customer, specify its CustomerID in the textbox besides the dropdown list, fill other details and hit the Insert button. Finally, to delete a Customer, select its CustomerID from the dropdown list and click on the Delete button.

To create this page, add a new controller - HomeController - in the Controllers folder. Also add Index view and write the following HTML markup into it:

<h1>Customer Manager</h1>
<form>
    <table border="1">
        <tr>
            <td>Customer ID :</td>
            <td>
                <select id="customerid"></select>
                OR
                <input id="newcustomerid" type="text" />
            </td>
        </tr>
        <tr>
            <td>Company Name :</td>
            <td><input id="companyname" type="text" /></td>
        </tr>
        <tr>
            <td>Contact Name :</td>
            <td><input id="contactname" type="text" /></td>
        </tr>
        <tr>
            <td>Country :</td>
            <td><input id="country" type="text" /></td>
        </tr>
        <tr>
            <td colspan="2">
                <input type="button" id="insert" 
                       value="Insert" />
                <input type="button" id="update" 
                       value="Update" />
                <input type="button" id="delete" 
                       value="Delete" />
            </td>
        </tr>
    </table>
    <br />
    <div id="msg"></div>
</form>

To invoke the Web API you created earlier, you will use jQuery Ajax. So, add Scripts folder under the wwwroot folder and place jQuery library into it.

image

Also, add a <script> reference to the jQuery library in the <head> section of the Index view.

 <script src="~/Scripts/jquery-3.1.1.min.js"></script>

There are in all five jQuery Ajax calls needed by our client. They are as follows:

  • As soon as the page loads in the browser, the dropdown list should be filled with all the existing CustomerIDs. This is done by calling the Get() Web API action through jQuery Ajax.
  • When you pick a CustomerID from the dropdown list its details such as CompanyName, ContactName and Country are displayed in the respective textboxes. This is done by calling the Get(id) Web API action from the change event handler of the dropdown list.
  • Clicking Insert, Update and Delete buttons call the Post(), Put() and Delete() Web API actions respectively, again through jQuery Ajax.

Ok. Let's go ahead and write the first Ajax call.

Filling the dropdown list with CustomerIDs

$(document).ready(function () {
    var options = {};
    options.url = "/api/customerservice";
    options.type = "GET";
    options.dataType = "json";
    options.success = function (data) {
        data.forEach(function (element) {
            $("#customerid").append("<option>" 
            + element.customerID + "</option>");
        });
    };
    options.error = function () {
        $("#msg").html("Error while 
                  calling the Web API!");
    };
    $.ajax(options);
});

The above code makes an Ajax request using $.ajax() method of jQuery. Notice how the url, type and dataType properties of the options object are specified. Since we wish to invoke Get() action, the url points to the Web API end point. The HTTP verb used is GET and the response data type is set to json.

The success function simply fills the dropdown list with a series of <option> element each wrapping a CustoemrID. The error function displays an error message in case something goes wrong while calling the Web API.

Displaying details of a selected customer

The change event handler of the dropdown looks like this:

$("#customerid").change(function () {
    var options = {};
    options.url = "/api/customerservice/" + 
                   $("#customerid").val();
    options.type = "GET";
    options.dataType = "json";
    options.success = function (data) {
        $("#companyname").val(data.companyName);
        $("#contactname").val(data.contactName);
        $("#country").val(data.country);
    };
    options.error = function (a, b, c) {
        alert(a.responseText);
        $("#msg").html("Error while 
                  calling the Web API!");
    };
    $.ajax(options);
});

This code is quite similar to the previous one. However, it appends the CustomerID whose details are to be fetched to the url. The success function fills the three textboxes with CompanyName, ContactName and Country. Notice something important - the property names are automatically converted to use camel casing. This way client side code gets to stick with the JavaScript ways of naming the things whereas server side code can continue to stick to the C# ways of naming the things.

Adding a new customer

The click event handler of the Insert button is shown below:

$("#insert").click(function () {
    var options = {};
    options.url = "/api/customerservice";
    options.type = "POST";

    var obj = {};
    obj.customerID = $("#newcustomerid").val();
    obj.companyName = $("#companyname").val();
    obj.contactName = $("#contactname").val();
    obj.country = $("#country").val();

    options.data = JSON.stringify(obj);
    options.contentType = "application/json";
    options.dataType = "html";

    options.success = function (msg) {
        $("#msg").html(msg);
    };
    options.error = function () {
        $("#msg").html("Error while 
                  calling the Web API!");
    };
    $.ajax(options);
});

The above code uses POST verb to make the Web API call. Moreover, it sets data, dataType and contentType properties. The data property is set to the stringified version of the new customer object. Notice that this new object also uses camel casing while setting the properties. The dataType property is set to html because our Post() action returns a plain string. The contentType property indicates the request's data type - JSON in this case.

The success function simply displays the message returned by the Post() action into the msg <div> element.

Modifying an existing customer

The click event of the Update button is shown below:

$("#update").click(function () {
    var options = {};
    options.url = "/api/customerservice/" 
                  + $("#customerid").val();
    options.type = "PUT";

    var obj = {};
    obj.customerID = $("#customerid").val();
    obj.companyName = $("#companyname").val();
    obj.contactName = $("#contactname").val();
    obj.country = $("#country").val();

    options.data = JSON.stringify(obj);
    options.contentType = "application/json";
    options.dataType = "html";
    options.success = function (msg) {
        $("#msg").html(msg);
    };
    options.error = function (a, b, c) {
        alert(c);
        $("#msg").html("Error while 
                  calling the Web API!");
    };
    $.ajax(options);
});

Most of the above code is similar to the code you wrote in the insert click event handler. The CustomerID being modified is appended to the url. The HTTP verb is set to PUT.

Deleting a customer

Finally, the code that deletes a customer is shown below:

$("#delete").click(function () {
    var options = {};
    options.url = "/api/customerservice/" 
                  + $("#customerid").val();
    options.type = "DELETE";
    options.dataType = "html";
    options.success = function (msg) {
        $("#msg").html(msg);
    };
    options.error = function () {
        $("#msg").html("Error while 
                  calling the Web API!");
    };
    $.ajax(options);
});

The above code sets the HTTP verb to DELETE and makes an Ajax call as before.

This completes the jQuery client to the Web API. Run the Index view and test all the operations.

In the next article you will develop a remote client to consume the Web API. Till then keep coding!!

READ MORE

Most of the times the JavaScript event handlers attached with an element fire every time the event under consideration is raised. For example, if you wire a click event handler to the click event of a button then clicking that button will invoke the event handler function every time. At times, however, this behavior is undesirable.

Suppose that you have a hyperlink or a button and clicking on that element causes an Ajax request to be sent to the server. The Ajax request returns some data that is loaded in some other element. Once the data is retrieved there is no need for the click event handler to fire. If you keep firing the click event handler you would be unnecessary making Ajax requests to the server.

One way to avoid these unwanted Ajax requests is to maintain a flag that tells you whether data for an element has already been retrieved or not. However, this may slightly complicate the JavaScript code. As an alternative you can unsubscribe the click event handler when it gets executed the first time. That means you need to create event handlers that fire only one time. Luckily, jQuery provides an inbuilt way to accomplish this task - one() method.

To understand how the one() method is used you will create an ASP.NET Web Form as shown below:

image

As you can see the above Web Form consists of a GridView control that lists EmployeeID, FirstName and LastName from the Employees table of Northwind database. The Get Notes column is a a HyperLinkField and doesn't have any server side functionality. Clicking on the Get Notes link executes some Ajax code that retrieves Notes for an employee. The Notes are appended to a Label control placed below the GridView. Once retrieved there is no need to retrieve Notes of the same employee again and hence the click event handler of the Get Notes link for that employee can be removed.

To develop this example, create an empty ASP.NET Web Forms application. Then add the ADO.NET Entity Framework Data Model for the Employees table. The following figure shows how the Employee entity class looks like:

image

Then add a Web Form to the project and place a GridView on it. Add two BoundField columns and one HyperLinkField column to the GridView and design it as shown in the beginning of  this article. Also, place a Label control below the GridView.

Now, set the SelectMethod property of the GridView to GridView1_GetData and add the GridView1_GetData() method in the code behind. This method does the job of fetching employee records from the database and is shown below:

public IQueryable GridView1_GetData()
{
    NorthwindEntities db=new NorthwindEntities();
    var query = from emp in db.Employees
                where emp.Country=="USA"
                orderby emp.EmployeeID
                select new { EmployeeID=emp.EmployeeID,
                             FirstName=emp.FirstName,
                             LastName=emp.LastName };
    return query;
}

The GridView1_GetData() returns all the Employee records where Country is USA. Only the EmployeeID, FirstName and LastName columns are returns because our example needs only these columns.

Now, add a [WebMethod] named GetNotes() as shown below:

[WebMethod]
public static string GetNotes(int employeeid)
{
  NorthwindEntities db = new NorthwindEntities();
  var query = from emp in db.Employees
              where emp.EmployeeID == employeeid
              select emp.Notes;
  return query.SingleOrDefault().ToString();
}

The GetNotes() web method is intended to be called from the client side script using Ajax. The GetNotes() method accepts an EmployeeID and returns the Notes for that employee.

Next, add a <script> reference to jQuery library and also add a <script> block in the head section of the Web Form. Key in the following jQuery code in the <script> block:

$(document).ready(function () {
  $("a").one("click", function (evt) {
    var empId = $(evt.target).closest("tr").children(":first-child").text();
    $.ajax({
      url: "WebForm1.aspx/getnotes",
      type: "POST",
      data: JSON.stringify({ employeeid: empId }),
      dataType: "json",
      contentType: "application/json",
      success: function (result) {
        $("#lblNotes").append(result.d + "<hr />");
      },
      error: function () { alert('error'); }
   });
  });
});

The above code uses one() method of jQuery to wire a one time event handler to all the hyperlink elements from the Web Form. In our case this will cause all Get Notes links to have the specified function as the one time click event handler. The first parameter of the one() method is the type of event that is to be handled (click in this case). The second parameter is the event handler function. The event handler function retrieves the EmployeeID from the first column of the row whose Get Notes link is clicked. Notice the use of closest(), children() methods and :first-child selector to accomplish this task.

Then an Ajax call is made to the GetNotes() web method using jQuery .$ajax(). The EmployeeID retrieved earlier is passed as the data parameter. The success function receives the return value of the web method. In this case the success function will receive the Notes for that employee. The Notes are then appended in the Label (lblNotes) using append() method.

To test the function of the Web Form, set a breakpoint at the GetNotes() web method and run the application. You will observe that when you click on the Get Notes link for an employee for the first time, the Ajax call is made and the Notes are retrieved from the database. This will be evident from the fact that your execution will halt at the breakpoint. Once Notes for an Employee are retrieved clicking on Get Notes doesn't cause the Ajax call and the web method won't be called again and again. That's what we wanted!

That's it! Keep coding.

READ MORE

Ajax stands for "Asynchronous JavaScript and XML".

JavaScript includes features of sending asynchronous http request using XMLHttpRequest object. Ajax is about using this ability of JavaScript to send asynchronous http request and get the xml data as a response (also in other formats) and update the part of a web page (using JavaScript) without reloading or refreshing entire web page.

The following figure illustrates the Ajax functionality.

Ajax

The jQuery library includes various methods to send Ajax requests. These methods internally use XMLHttpRequest object of JavaScript. The following table lists all the Ajax methods of jQuery.

jQuery Ajax MethodsDescription
ajax()Sends asynchronous http request to the server.
get()Sends http GET request to load the data from the server.
Post()Sends http POST request to submit or load the data to the server.
getJSON()Sends http GET request to load JSON encoded data from the server.
getScript()Sends http GET request to load the JavaScript file from the server and then executes it.
load()Sends http request to load the html or text content from the server and add them to DOM element(s).

The jQuery library also includes following events which will be fired based on the state of the Ajax request.

jQuery Ajax EventsDescription
ajaxComplete()Register a handler function to be called when Ajax requests complete.
ajaxError()Register a handler function to be called when Ajax requests complete with an error.
ajaxSend()Register a handler function to be called before Ajax request is sent.
ajaxStart()Register a handler function to be called when the first Ajax request begins.
ajaxStop()Register a handler function to be called when all the Ajax requests have completed.
ajaxSuccess()Register a handler function to be called when Ajax request completes successfully.

Advantages of jQuery Ajax:

  1. Cross-browser support
  2. Simple methods to use
  3. Ability to send GET and POST requests
  4. Ability to Load JSON, XML, HTML or Scripts

Let's look at an overview of important jQuery Ajax methods in the next section.

READ MORE

In the previous article you learnt to consume a Web API created in ASP.NET Core using jQuery client. Although local clients are quite common in Ajax rich applications, many real-world situations require that you call a Web API from a different application. Thus the client application and the Web API application are different and you can't use JavaScript to call the Web API (due to default browser settings). Moreover, if you wish to call a Web API from a desktop application JavaScript is not an option. In such cases you can use HttpClient to call the Web API. This article tells you how.

I assume that you have the Web API we developed in the earlier parts of this series ready with you. Add a new ASP.NET Core project to the same solution and configure it to use ASP.NET Core MVC. We won't go into the details of that configuration here since that's the basic step for creating any web application under ASP.NET Core.

Once you have the new project configured, open Project.json and add the two dependencies:

"System.Net.Http": "4.3.0-preview1-24530-04",
"Newtonsoft.Json": "9.0.2-beta1"

Notice the System.Net.Http entry. This is a NuGet package that supplies us the HttpClient component. The Json.Net component comes from the Newtonsoft.Json NuGet package and does the trick of JSON serialization and deserialization for us.

Now add a new controller - HomeController - to the project (remember now you are coding in the client application's project, not the Web API project). The HomeController will have seven actions as outlined below:

  • Index() : Returns a view displaying a list of existing customers.
  • Insert() and Insert(obj) : Handle the insert operation by adding a new customer.
  • Update(id) and Update(obj) : Handle the update operation by modifying an existing customer.
  • ConfirmDelete() and Delete() : Handle delete confirmation and delete operations by removing a customer.

In the section that follow I won't discuss the views and their markup in detail. They are quite straightforward and similar to ASP.NET MVC views. Our main interest is the actions that make use of HttpClient component to call the Web API.

Displaying a list of customers

The Index view that displays a list of all the customers looks like this:

image

The Index() action behind this view is shown below:

public ActionResult Index()
{
    using (HttpClient client = new HttpClient())
    {
        client.BaseAddress = new Uri
("http://localhost:49387");
        MediaTypeWithQualityHeaderValue contentType = 
new MediaTypeWithQualityHeaderValue("application/json");
        client.DefaultRequestHeaders.Accept.Add(contentType);
        HttpResponseMessage response = client.GetAsync
("/api/customerservice").Result;
        string stringData = response.Content.
ReadAsStringAsync().Result;
        List<Customer> data = JsonConvert.DeserializeObject
<List<Customer>>(stringData);
        return View(data);
    }
}

The Index() action creates a new instance of HttpClient and sets its BaseAddress and accept header accordingly. Make sure to change the base address as per your setup. The code then calls the GetAsync() method of HttpClient to invoke the Get() action of the Web API. Since the content type is set to JSON, the Web API will its data in JSON format. This data is unpacked from the HttpResponseMessage object using the ReadAsStringAsync() method. The JSON string is then deserialized into a List of Customer objects using Json.Net component's JsonConvert class.

Adding a new customer

The Insert view that allows you to add a new customer is shown below:

image

The GET and POST versions of the Insert() action are shown below:

public ActionResult Insert()
{
    return View();
}

[HttpPost]
public ActionResult Insert(Customer obj)
{
    ....
    string stringData = JsonConvert.
SerializeObject(obj);
    var contentData = new StringContent
(stringData, System.Text.Encoding.UTF8, 
"application/json");
    HttpResponseMessage response = client.PostAsync
("/api/customerservice", contentData).Result;
    ViewBag.Message = response.Content.
ReadAsStringAsync().Result;
    return View(obj);
    ....
}

The GET version of Insert() simply returns the Insert view to the browser.

The POST version of Insert() first serializes the Customer object received through the model binding into a JSON string. This is necessary because we want to POST data in JSON format. The code then wraps this JSON string into a StringContent object. Notice that the StringContent constructor sets the encoding to UTF8 and media type to JSON. The code then calls the PostAsync() method of HttpClient and submits the JSON data to the Web API using POST verb. The string message returned by the Web API is unwrapped from HttpResponseMessage object using its ReadAsStringAsync() method.

Modify a customer

The Update view looks like this:

image

And the two Update() actions responsible for the relevant functionality are as shown below:

public ActionResult Update(string id)
{
    HttpResponseMessage response = 
client.GetAsync("/api/customerservice/" + id).Result;
    string stringData = response.Content.
ReadAsStringAsync().Result;
    Customer data = JsonConvert.
DeserializeObject<Customer>(stringData);
    return View(data);
}

[HttpPost]
public ActionResult Update(Customer obj)
{
    string stringData = JsonConvert.SerializeObject(obj);
    var contentData = new StringContent(stringData,
System.Text.Encoding.UTF8,"application/json");
    HttpResponseMessage response = client.PutAsync
("/api/customerservice/" + obj.CustomerID, 
contentData).Result;
    ViewBag.Message = response.Content.
ReadAsStringAsync().Result;
    return View(obj);
}

The GET version of Update() action invokes Get(id) of Web API using the GetAsync() method of HttpClient. Notice that this time CustomerID is appended in the URL. The returned Customer object is unpacked using the ReadAsStringAsync() method and the stringified JSON is collected in a string variable. This JSON string is then deserialized into a Customer object using Deserialize() method if JsonConvert.

The POST version of Update() is quite similar to the POST version of Insert() we discussed earlier. However, this time we use PutAsync() method by passing the CustoemrID and the stringified JSON data. The string message is then read using ReadAsStringAsync() as before.

Deleting a customer

 Clicking the Delete links from the Index view takes you to a confirmation page as shown below:

image

The ConfirmDelete() action behind this view is shown below:

public ActionResult ConfirmDelete(string id)
{
    HttpResponseMessage response = 
client.GetAsync("/api/customerservice/" + id).Result;
    string stringData = response.
Content.ReadAsStringAsync().Result;
    Customer data = JsonConvert.
DeserializeObject<Customer>(stringData);
    return View(data);
}

This action is same as the GET version of Update() action.

When you click on the Delete button to delete the selected customer, the page is POSTed to Delete() action:

[HttpPost]
public ActionResult Delete(string customerid)
{
    HttpResponseMessage response = 
client.DeleteAsync("/api/customerservice/" 
+ customerid).Result;
    TempData["Message"] = 
response.Content.ReadAsStringAsync().Result;
    return RedirectToAction("Index");
}

The Delete() action receives the CustomerID through model binding. Remember to emit this value on the ConfirmDelete view using a hidden field (or any other technique of your choice). The code then calls the DeleteAsync() method if the HttpClient to invoke the Delete() action of Web API. The string message returned from the Web API is stored in a TempData entry so that it can be outputted on the Index view.

That's it! This complete the remote client for the Web API. Run the Index view and test all the CRUD operations.

READ MORE

Modern web applications heavily rely on JavaScript and JavaScript frameworks. That's why ASP.NET developers need to be aware of JavaScript concepts such as Immediately Invoked Function Expressions (IIFE) and Closures. To that end this article presents a quick introduction to these two features.

Immediately Invoked Function Expressions (IIFE)

An immediately invoked function expression is a JavaScript function that is executed immediately after it is created. Usually you create a named or anonymous JavaScript function and then somewhere in the code you call that function. Consider the following code:

function HelloWorld() {
    alert("Hello World!");
}

var myfunction = function () {
    alert("Hello World!");
}

HelloWorld();
myfunction();

Here, the code creates a named function called HelloWorld(). The code also creates an anonymous function and stores it in a variable - myfunction. The code then proceeds to call these two functions. That means function creation and function execution are two distinct steps.

Using IIFE you can create and run a function immediately. The following syntax shows how:

(function () {
    alert("Hello World!");
})();

As you can see, the above code creates an anonymous function. The whole function is enclosed in brackets and is immediately followed by (). This way function creation and execution are combined. The function can take parameters just like any other JavaScript function.

(function (msg) {
    alert(msg);
})("Hello World!");

Now the function takes msg parameter. While invoking the function a value of Hello World! is passed to the function.

If you ever created a jQuery plugin you will find that many of them use IIFE pattern. Consider the following jQuery plugin:

(function ($) {
    $.fn.myPlugin = function (settings) {
       //plugin code here
    }
})(jQuery);

As you can see, this template for a jQuery plugin consists of an anonymous function that takes a single parameter - $ ($ is a valid variable name in JavaScript). The actual code of the plugin goes inside the inner anonymous function (the one that is assigned to myPlugin ).

The outer function is immediately executed by passing jQuery object to it as a parameter. This way all the inner code of the IIFE refers to the jQuery object as $. This pattern ensures that the meaning of $ is preserved for all the inside code.

JavaScript Closures

 Simply put a closure is an inner function that has access to the parameters and variables defined in the outer function. Moreover, this environment is preserved even if the outer function returns.

The following code will make this clear:

function Outer(msg) {

    function Inner() {
        alert(msg);
    }

    Inner();
}

Outer("Hello World!");

Here, the outer function accepts msg parameter. The msg parameter is used by the inner function and is displayed using an alert. Then the outer function calls the inner function. The external code then invokes the outer function (external code won't have access to inner function).

Now let's see a bit complex usage of closures.

function Outer() {
    var msg = "";

    var obj = {};
    obj.setMsg = function (val) {
        msg = val;
    };
    obj.getMsg = function () {
        return msg;
    };

    return obj;
}

var result = Outer();
result.setMsg("Hello World!");
alert(result.getMsg());

Here, the Outer() function defines a variable - msg - in it's private scope. Then a JavaScript object is created and two function properties are added to it - setMsg() and getMsg(). The setMsg() function assigns a new value to the msg variable. The getMsg() returns the value of msg to the caller.

The obj is returned to the caller. At this stage the Outer() returns. Since Outer() has returned, ordinarily you would expect msg variable to go out of scope. However, result.setMsg() and result.getMsg() still work as expected. This indicates that even if the function has returned the environment has been preserved.

Closures are widely used in jQuery as well as AngularJS to organize the code.

READ MORE
...