Introduction
Since their introduction ASP.NET application services are popular and widely adopted means to implement membership, profile and role based security in web applications. Starting from .NET framework 3.5, Windows applications can also avail these features under the banner of Client Application Services. In this article I will show you how these services can be consumed in Windows Forms applications.
When to use Client Application Services?
Client application services allow you to do the following tasks:
- Authenticate users
- Implement role based security
- Read and write Web settings (Profile) for a user
Client application services can be used in the following situations:
- When you wish to share the same user credentials between web and windows applications
- While developing a smart client application
- When part of the system is web based and part of it is Windows based
It should be noted, however, that client application services are not standalone equivalent of application services for Windows applications. They are designed to allow Windows application share the same set of users that a web site is using.
Namespaces involved
The System.Web.Extensions assembly provides two namespaces related to client application services:
- System.Web.ClientServices
- System.Web.ClientServices.Providers
The former namespace contains classes that provide support to the ASP.NET application services. The later namespace contains classes related to client service providers.
Implementation steps
In order to make use of the client application services you need to take the following steps:
- Configure database to support application services
- Create a web site application
- Configure membership, role and profile providers
- Expose ASP.NET application services to Windows applications
- Create a Windows Forms application
- Enable client application services in the Windows Forms application
- Retrieve profile properties in the Windows Forms application
- Consume client application services
Let's develop a simple example that implements all the above steps.
Configure database to support application services
In order to configure a database to support ASP.NET application services you need to run aspnet_regsql.exe command line tool. If you ever used application services before you should be familiar with this command. Running this tool starts a wizard that guides you to further steps. The following figure shows the initial wizard step.
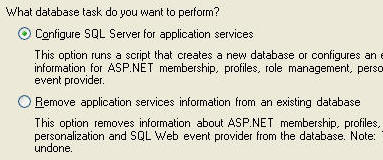
This tool creates several tables and stored procedures in the specified database that are used by ASP.NET application services.
Create a web site application
Now create a new web site using Visual Studio. In real world scenario this will be a functional web site. Since our intention is to illustrate the user of client application services we will not develop any web form in the web site. You can safely delete all the web forms from this web site. You nevertheless need to create the web site because it is this web site that expose the ASP.NET application services to Windows Forms application.
Configure membership, role and profile providers
The next step is to enable Forms authentication and configure membership, role and profile providers. Open web.config of the web site you just created and add the following markup to it.
<authentication mode="Forms"/>

<membership defaultProvider="p1">
<providers>
<add name="p1" connectionStringName="connstr"
type="System.Web.Security.SqlMembershipProvider"/>
</providers>
</membership>

<roleManager enabled="true" defaultProvider="p2">
<providers>
<add name="p2" connectionStringName="connstr"
type="System.Web.Security.SqlRoleProvider"/>
</providers>
</roleManager>

<profile enabled="true" defaultProvider="p3">
<providers>
<add name="p3" connectionStringName="connstr"
type="System.Web.Profile.SqlProfileProvider"/>
</providers>
<properties>
<add name="FullName" type="string"
readOnly="false" defaultValue="abcd"
serializeAs="String" allowAnonymous="false"/>
</properties>
</profile>
Here, we first enabled Forms authentication for the web site. Then we configure membership, role and profile providers using <membership>, <roleManager> and <profile> tags. Make sure that the connection string connstr points to your database that you configured for application services. Notice that the above markup defines one profile property named FullName that is of type string.
Expose ASP.NET application services to Windows applications
Now comes the important step. In order that Windows applications can consume ASP.NET application services you must expose them from your web site. This is done by adding <system.web.extensions> section inside <configuration> root element.
<system.web.extensions>
<scripting>
<webServices>
<authenticationService
enabled="true" requireSSL="false"/>
<roleService enabled="true"/>
<profileService enabled="true"
readAccessProperties="FullName"
writeAccessProperties="FullName"/>
</webServices>
</scripting>
</system.web.extensions>
Notice the markup shown in bold letters. The <authenticationService>, <roleService> and <profileService> tags expose membership, role and profile services to the external world.
If you worked in ASP.NET AJAX you should be familiar with this markup as AJAX consumes the same services from client side script.
Observe the <profileService> markup carefully. The readAccessProperties and writeAccessProperties attributes govern which profile properties can be read and write respectively.
In real world cases you will be deploying this web site to a known URL. For the sake of testing however we need to tell Visual Studio the port number to use for running this web site. This is done in the web site property pages as shown below:
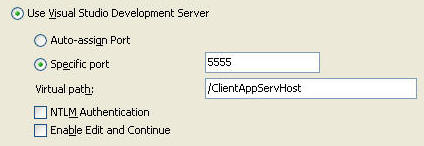
Make sure to specify a specific port (5555 in the above figure) and a virtual path (/ClientAppServHost). This way at runtime the URL of our web site will be http://localhost:5555/ClientAppServHost.
Create a Windows Forms application
The next step is to add a new Windows Forms application to the current Visual Studio solution. Open its property pages and locate Services tab. This tab allows you to enable client application services for the Windows application. Ensure that the "Enable client application services" checkbox is checked. Also, specify authentication service location, roles service location and web settings (Profile) service location to http://localhost:5555/ClientAppServHost.
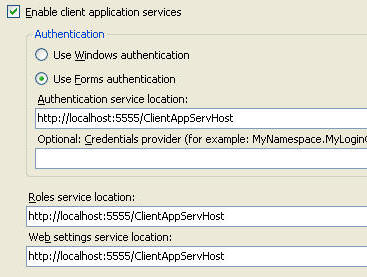
This way the Windows Forms application knows how to connect with the appropriate membership, roles and profile provider.
Retrieve profile properties in Windows Forms application
In order to access profile properties in Windows applications in strongly typed fashion you need to retrieve them from the web site. To do so open properties tab of the Windows application and select its Settings tab.
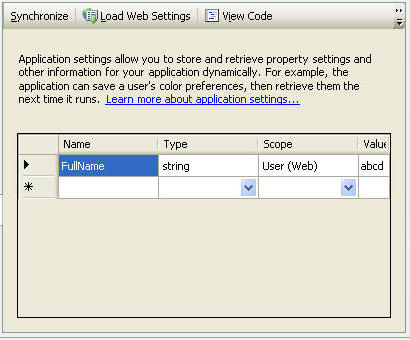
Click on "Load Web Settings" option to open a login dialog as shown below:
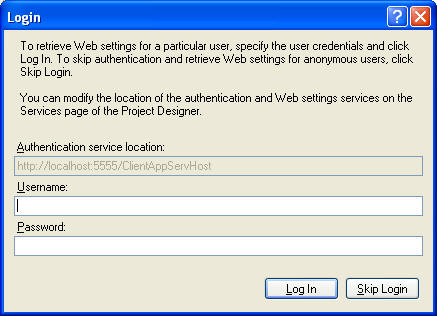
Enter user ID and password of any one user of the web site and click "Log In". This will load profile properties in the grid of Settings tab (see Settings tab screenshot above).
Consuming client application services
Now we arrive at the last step. Design the default Windows form from your application as shown below:
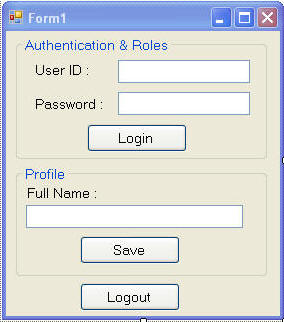
In the Click event handler of Login button add the following code:
private void btnLogin_Click
(object sender, EventArgs e)
{
string msg = "Welcome ";
if (!Membership.ValidateUser(txtUserID.Text,
txtPassword.Text))
{
MessageBox.Show("Invalid User ID or Password!");
}
else
{
msg = msg + txtUserID.Text;
}
if (Thread.CurrentPrincipal.IsInRole("Manager"))
{
msg = msg + " [Manager]";
}
if (Thread.CurrentPrincipal.IsInRole("Operator"))
{
msg = msg + " [Operator]";
}
MessageBox.Show(msg);
...
txtFullName.Text = Properties.Settings.
Default.FullName;
}
Here, we used Validate() method of membership class to check if the user ID and password are valid. If so you check if the user belongs to Manager role. This is done using IsInRole() method of the Principal object of current thread. This principle is automatically populated with appropriate identity and role information. Finally, FullName profile property is read using Settings collection. Notice how the FullName property is accessed in typed fashion.
Now add the following code in the Click event handler of Save button.
private void btnSave_Click
(object sender, EventArgs e)
{
Properties.Settings.Default.FullName
= txtFullName.Text;
Properties.Settings.Default.Save();
}
The code sets the FullName profile property to the new value and calls Save() method. This way the new value gets stored in the database.
Finally add the following code in the Click event hander of Logout button.
private void button3_Click
(object sender, EventArgs e)
{
ClientFormsAuthenticationMembershipProvider
authProvider =
(ClientFormsAuthenticationMembershipProvider)
Membership.Provider;
authProvider.Logout();
...
}
The code accesses membership provider using the Provider property of Membership class. This provider is of type ClientFormsAuthenticationMembershipProvider, a class residing in System.Web.ClientServices.Providers namespace. Logout() method of the provider is then called.
That's it. To test the application create couple of users and roles in the web site using Web Site Administration tool and run the Windows Forms application.

