AngularJS
AngularJS is an open source JavaScript framework that allows to move the presentation logic on the client side and thus separate it from the logic of the application that remains on the server. AngularJS aims to minimize this complexity by offering a great environment for development, as well as the means to test your apps.

Pre-request Language
Start your First HTML page with AngularJS
AngularJS is distributed as a JavaScript file, and can be added to a web page with a script tag:
<!DOCTYPE html>
<Html>
<script src="https://ajax.googleapis.com/ajax/libs/angularjs/1.6.4/angular.min.js">
</script>
<Body>
<div ng-app="">
<p>Addition of 5 and 7 = {{5 + 7}} </p>
</div>
</body>
</html>

AngularJS Applications
Data Binding
Data-binding is an automatic way of updating the view whenever the model changes, as well as updating the model whenever the view changes.
Controller
AngularJS controller to control the flow of data in the application. AngularJS controller is defined with ng-controller directive. AngularJS controller is a JavaScript object containing attributes/properties and functions.
<!DOCTYPE html>
<html>
<script src="https://ajax.googleapis.com/ajax/libs/angularjs/1.6.4/angular.min.js">
</script>
<script>
//AngularJS Module
var app = angular.module('myApp', []);
//AngularJS Controller
app.controller('myCtrl', function($scope) {
$scope.firstName= "Atindra";
$scope.lastName= "Nath";
});
</script>
<body>
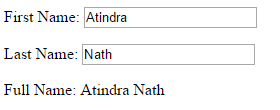
<div ng-app="myApp" ng-controller="myCtrl">
First Name: <input type="text" ng-model="firstName"><p/>
Last Name: <input type="text" ng-model="lastName"><p/>
Full Name: {{firstName + " " + lastName}}
</div>
</body>
</html>
Output
Separating Controller and Module files
<html>
<head>
<script src="https://ajax.googleapis.com/ajax/libs/angularjs/1.6.4/angular.min.js"></script>
<script src="module/moduleScript.js"></script>
<script src="controller/controllerScript.js"></script>
</head>
<body ng-app="myApp" ng-controller="myCtrl">
<div ng-controller="myCtrl">
First Name: <input type="text" ng-model="firstName"><p/>
Last Name: <input type="text" ng-model="lastName"><p/>
Full Name: {{firstName + " " + lastName}}
</div>
</body>
</html>
//AngularJS Module File (moduleScript.js)
var module = angular.module('myApp', []);
//AngularJS Controller (controllerScript.js)
module.controller('myCtrl', function($scope) {
$scope.firstName= "Atindra";
$scope.lastName= "Nath";
});
AngularJS Directives
AngularJS directives are extended HTML attributes with the prefix ng-.
- ng-app − This directive starts an AngularJS Application.
- ng-init − This directive initializes application data.
- ng-model − This directive binds the values of AngularJS application data to HTML input controls.
ng-repeat − This directive repeats html elements for each item in a collection.
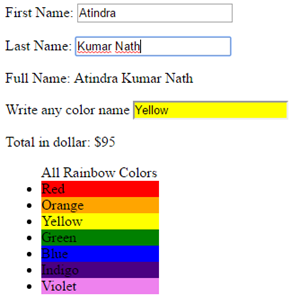
<body ng-app="myApp" ng-controller="myCtrl">
<div>
First Name: <input type="text" ng-model="firstName"><p/>
Last Name: <input type="text" ng-model="lastName"><p/>
Full Name: {{firstName + " " + lastName}}
</div>
<p ng-init="myCol='blue'">Write any color name
<input style="background-color:{{myCol}}"
ng-model="myCol" value="{{myCol}}">
</p>
<div ng-init="cost=5; quantity= [1, 15, 19, 2, 40] ;">
<p>Total in dollar: ${{quantity [2] * cost}} </p>
</div>
<div>
<ul>All Rainbow Colors
<li ng-repeat="x in colors">
<div style="background-color :{{ x}}; width: 10%" > {{x}} </div>
</li>
</ul>
</div>
</body>
Output