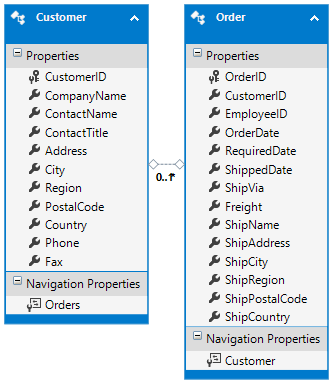
Recently during a training program one of the participant asked this question - "How to create a login page using jQuery Ajax in MVC applications?" This article is illustrates how Ajax login can be implemented using Forms authentication, Membership and jQuery $.ajax().
Implementing Ajax based login involves many of the same steps as the normal forms authentication. However, the login page doesn't send user ID and password to the server through a standard form submission. Instead, user credentials are sent to the server via an Ajax request. The credentials are then validated on the server and the result of the verification process is conveyed to the client. If the login attempt was successful, the user is taken to the secured area of the website.
Let's understand how all this works by developing a sample application. Begin by creating a new ASP.NET MVC Web Application using an empty template. To keep things simple we will add only those things to the project that are absolutely essential to the functioning of this example.
Configure a database for membership services
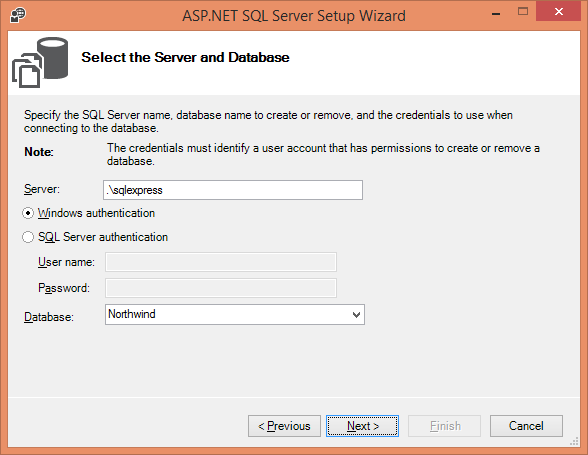
First of all you need to configure a database for membership services. This is done with the help of aspnet_regsql.exe tool. Open Visual Studio developer command prompt and issue the said command to open the configuration wizard. Simply follow the wizard to configure your database. For example, here I am configuring Northwind database to support membership services.
Configure forms authentication and membership provider
Next, open the web.config of the web application and configure the authentication scheme as shown below:
<connectionStrings>
  <add name="connstr" connectionString="data source=.\sqlexpress;
                      initial catalog=Northwind;integrated security=true"/>
</connectionStrings>

<system.web>
  <authentication mode="Forms">
    <forms loginUrl="~/account/login" defaultUrl="~/home/index"></forms>
  </authentication>
  ...
</system.web>
The <authentication> tag sets the authentication mode to Forms. The forms authentication is configured to have login page as ~/account/login and default page as ~/home/index. The <connectionStrings> section defines a database connection string for the Northwind database. This connection string is used while configuring the membership provider.
To configure the membership provider add the following markup to the web.config file:
<membership defaultProvider="p1">
  <providers>
    <add name="p1" connectionStringName="connstr"
                   type="System.Web.Security.SqlMembershipProvider" />
  </providers>
</membership>
Create Account controller
Then add a controller to the Controllers folder - AccountController. The Account controller contains code that validates a user. The Login() and ValidateUser() action methods of the Account controller are shown below:
public ActionResult Login()
{
    return View();
}

[HttpPost]
public JsonResult ValidateUser(string userid, string password,
                               bool rememberme)
{
    LoginStatus status = new LoginStatus();
    if (Membership.ValidateUser(userid, password))
    {
        FormsAuthentication.SetAuthCookie(userid, rememberme);
        status.Success = true;
        status.TargetURL = FormsAuthentication.
                           GetRedirectUrl(userid, rememberme);
        if (string.IsNullOrEmpty(status.TargetURL))
        {
            status.TargetURL = FormsAuthentication.DefaultUrl;
        }
        status.Message = "Login attempt successful!";
    }
    else
    {
        status.Success = false;
        status.Message = "Invalid UserID or Password!";
        status.TargetURL = FormsAuthentication.LoginUrl;
    }
    return Json(status);
}
The Login() action method simply returns the Login view. The ValidateUser() method is important to us because this method validates the user credentials and is called via Ajax. The ValidateUser() method takes three parameters - userid, password and rememberme. Inside, it calls ValidateUser() method of the Membership object to decide whether the user ID and password is correct. The ValidateUser() method also creates an instance of LoginStatus class - a POCO that is intended to store the status of the login process. The LoginStatus class looks like this:
public class LoginStatus
{
    public bool Success { get; set; }
    public string Message { get; set; }
    public string TargetURL { get; set; }
}
The LoginStatus class consists of three properties - Success, Message and TargetURL. The Success boolean property holds true if the login attempt was successful, false otherwise. The Message property holds a succcess or error message that is to be displayed to the end user. The TargetURL property holds the page URL where the user should be redirected if the login attempt was successful.
Coming back to the ValidateUser() method, if the user credentials are valid a forms authentication cookie is issued using the SetAuthCookie() method. The LoginStatus object is populated with the required information. Notice how the TargetURL is determined using GetRedirectUrl() method and DefaultUrl properties of the FormsAuthentication class.
If the login attempt was unsuccessful, LoginStatus object is populated with error information. Finally, LoginStatus object is sent back to the caller using Json() method. Remember that ValidateUser() method will be called using Ajax and hence should return data to the browser in JSON format.
Create Login view
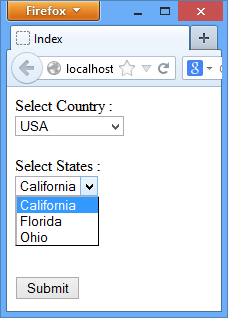
Now add the Login view and design it as shown below:
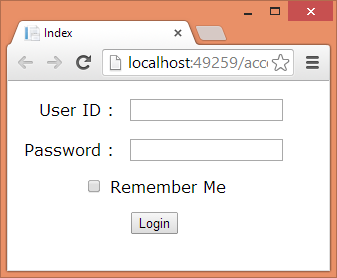
The Login view consists of a textbox, a password box, a checkbox and a button. Clicking on the Login button initiates an Ajax request to the ValidateUser() method you created earlier. The jQuery code responsible for calling the ValidateUser() method is given below:
$(document).ready(function () {
$("#login").click(function () {
$("#message").html("Logging in...");
var data = { "userid": $("#userid").val(),
"password": $("#password").val(),
"rememberme":$("#rememberme").prop("checked") };
$.ajax({
url: "/account/validateuser",
type: "POST",
data: JSON.stringify(data),
dataType: "json",
contentType: "application/json",
success: function (status) {
$("#message").html(status.Message);
if (status.Success)
{
window.location.href = status.TargetURL;
}
},
error: function () {
$("#message").html("Error while authenticating
user credentials!");
}
});
});
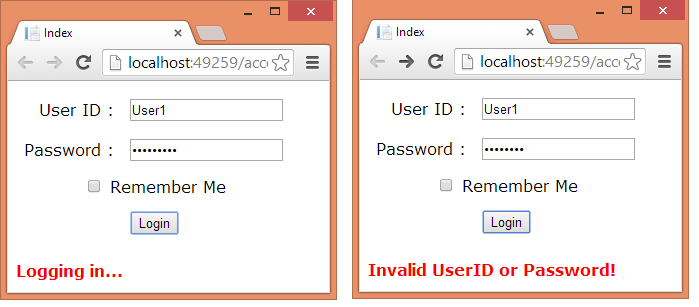
});Observe this code carefully. Upon clicking the login button a progress message is displayed in a message <div> element. The code then forms a JavaScript object that has three properties - userid, password and rememberme. These property names must match the parameter names of the ValidateUser() action method you created earlier. Then $.ajax() of jQuery is used to make an Ajax request to /account/validateuser. The type of the request is set to POST. The data setting contains the stringified version of the data JavaScript object you just created. The dataType and contentType properties are set to json and application/json respectively. These two properties represent the response format and the request MIME content type respectively. The success function receives a status object. This object is a JSON representation of LoginStatus object you return from the ValidateUser() method. If the Success property is true it means that the login attempt was successful and the user is redirected to the TargetURL using window.location.href property. If the login attempt fails an error message is displayed in the message <div>. The error function is invoked if there is any error making the Ajax call and simply displays an error message to the user.
The following figure shows the login view in action:
Create Home controller and Index view
If a login attempt is successful the use is taken to the Index view. So, add the Home controller and also the Index view. The Home controller is supposed to be a secured one and hence add [Authorize] attribute on top of the Index() action method or the HomeController class.
[Authorize]
public class HomeController : Controller
{
    public ActionResult Index()
    {
        return View();
    }
}
The Index view simply outputs a welcome message:
<body>
<h1>Welcome @Membership.GetUser().UserName!</h1>
</body>
The following figure shows a successful run of the Index view:
To test the application you just developed you need to create a new user account. You can do so either by creating a registration page or by adding a few test users in the Global.asax. For the sake of this example the later approach is alright. Here is how you can create a new user.
protected void Application_Start()
{
  ...
  MembershipCreateStatus status;
  Membership.CreateUser("User1",
  "some_password_here", "user1@somewebsite.com",
  "question", "answer", true, out status);
}
That's it! The Ajax login for your MVC application is ready :-)