top button
Flag Notify
    Connect to us
      Site Registration

Site Registration

Zip And Unzip Files Programmatically

+1 vote
293 views

Introduction

Recently one of the reader of DotNetBips.com posted a question on the discussion forums about compressing and decompressing files via code. There is no obvious answer to this question because C# and VB.NET lack this functionality. However, J# does have a way to zip and unzip files programmatically. In this article I am going to explain how this can be achieved. In this article you will develop a reusable class library that can be used to create, extract and alter ZIP files. Once developed you can use it in your Windows or web applications.

Background

In some applications it is needed that files (they may include documents, XML files or any other type of files) be compressed on the fly and ZIP file be created. For example, a typical requirement is that users should be able to select files and selected files should be downloaded as a single ZIP file on client machine. There is no out of the box solution for this requirement in C# and VB.NET. Developers often turn to the following alternatives:

  • Use a third party component
  • Use some open source component
  • Implement ZIP algorithm manually

The first option requires extra licensing cost and many times developers are reluctant to use third party black box components in their applications. The second option is certainly attractive as you get the complete source code of the component. However, licensing, bugs (if any), upgrades and support are still a big issue there. Finally, the last option is difficult and requires reasonable efforts from developer's end.

Luckily, J# (which is a part of overall .NET infrastructure) provides a handy way to compress and decompress files via code. The advantages of using J# compression features are:

  • J# is a part of overall .NET infrastructure
  • As J# is provided by Microsoft future upgrades and support is assured
  • No need to use any third party component

Considering this it makes sense to use J# features to compress and decompress files programmatically and that is what I am going to illustrate.

Creating a class library

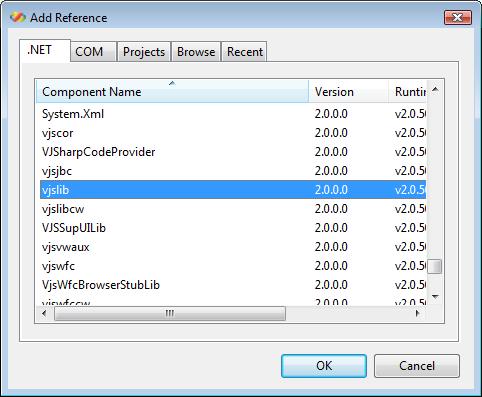
We will create a C# class library that will internally consume J# classes for compressing and decompressing files. This way once the library is developed any C# or VB.NET developer can consume it. To begin with create a new class library project. Add a class to it called ZipFileHelper. To use J# compression classes you must refer vjslib.dll assembly. The following figure shows the Add Reference dialog of Visual Studio with this assembly selected.

image

Once the reference is added to vjslib.dll, you also need to import the following namespaces:

  • java.util;
  • java.util.zip;
  • java.io;

The java.util namespace contains some utility classes. The java.util.zip namespace is the core namespace that contains classes related to ZIP file creation. Finally, the java.io namespace provides some classes related to file IO. The classes that we will use from the above namespaces are :

  • ZipFile
  • ZipEntry
  • InputStream
  • OutputStream
  • FileInputStream
  • FileOutputStream
  • ZipOutputStream
  • Enumeration

The ZipFile class is a programmatic representation of a ZIP file. A ZipFile contains zero or more ZipEntry objects and actual content of the zipped files. Each entry is nothing but metadata about a zipped file.

The InputStream, OutputStream, FileInputStream and FileOutputStream classes represent streams pointing to in-memory and file based streams respectively.

The ZipOutputStream class represents a writable stream pointing to a ZIP file. This stream can be used to write ZipEntry objects and content to the ZIP file.

Finally, the Enumeration class is J# way to represent collections.

Creating ZIP files

Before we actually write code to create or extract ZIP files let's create some helper methods that we need later. We need to create the following helper methods:

  • GetZippedItems()
  • CopyEntries() (two overloads)
  • CopyStream()
  • AddEntries()
  • RemoveEntries()

Obtaining a list of items inside a ZIP file

The GetZippedItems() method returns a generic List of ZipEntry objects from a ZipFile. The GetZippedItems() method is shown below:

private static List<ZipEntry> GetZippedItems(ZipFile file)
{
List<ZipEntry> entries = new List<ZipEntry>();
Enumeration e = file.entries();
while (true)
{
if (e.hasMoreElements())
{
ZipEntry entry = (ZipEntry)e.nextElement();
entries.Add(entry);
}
else
{
break;
}
}
return entries;            
}

The GetZippedItems() method accepts a ZipFile object and returns a generic List of ZipEntry objects. The method creates a generic collection of ZipEntry type. It then calls entries() method of ZipFile class to return an Enumeration of ZipEntry objects. The code then iterates through the enumeration and populates the List. Finally, the populated List is returned to the caller.

Copying streams

While adding or removing files from an existing ZIP file we need to copy contents of constituent files from source to destination streams. Hence, we need a helper method called CopyStreams() to do that job. The CopyStreams() method is shown below:

private static void CopyStream(InputStream source, 
     OutputStream destination)
{
sbyte[] buffer = new sbyte[8000];
int data;
while (true)
{
try
{
data = source.read(buffer, 0, buffer.Length);
if (data > 0)
{
destination.write(buffer, 0, data);
}
else
{
return;
}
}
catch (Exception ex)
{
string msg = ex.Message;
}
}            
}

The CopyStream() method accepts source and destination streams in the form of InputStream and OutputStream objects respectively. It then reads the source stream using read() method. The read() method reads data in chunks of 8000 sbytes (signed integer) and writes it to the destination stream using write() method of OutputStream class.

Copying ZipEntry objects

The J# compression classes do not allow you to add or remove files from an existing ZIP file. The only way to add or remove files from an existing ZIP file is to create a new ZIP file with required items and then replace original ZIP file with this newly created ZIP file. Hence, we need a helper method that copies ZipEntry objects from one ZIP file into the other. CopyEntries() is such a method. The CopyEntries() method has two overloads as shown below:

private static void CopyEntries(ZipFile source, 
     ZipOutputStream destination)
{
List<ZipEntry> entries = GetZippedItems(source);
foreach (ZipEntry entry in entries)
{
destination.putNextEntry(entry);
InputStream s = source.getInputStream(entry);

CopyStream(s, destination);
destination.closeEntry();
s.close();
}            
}
private static void CopyEntries(ZipFile source, 
     ZipOutputStream destination,string[] entryNames)
{
List<ZipEntry> entries = GetZippedItems(source);
for(int i=0;i<entryNames.Length;i++)
{
foreach (ZipEntry entry in entries)
{
if (entry.getName() == entryNames[i])
{
destination.putNextEntry(entry);
InputStream s = from.getInputStream(entry);

CopyStream(s, destination);
destination.closeEntry();
s.close();
}
}
}            
}

The first overload of CopyEntries() method accepts two parameters. The first parameter is the source ZipFile from which entries are to be copied. The second parameter is the target ZipOutputStream to which the entries are to be written.

The second overload of CopyEntries() method is intended to copy only certain entries and accepts three parameters. The significance of the first two parameters is the same as before. The third parameter is an array of entry names that are to be copied to the destination ZipOutputStream.

Both the overloads of CopyEntries() method essentially retrieve a List of ZipEntries using GetZippedItems() helper method. The entries are then transferred to the ZipOutputStream.  The putNextEntry() method of ZipOutputStream class accepts a ZipEntry to be added to the ZIP file and writes it to the ZIP file. The getInputStream() method of ZipFile class accepts a ZipEntry and returns an InputStream pointing to that entry. This stream is used by CopyStream() helper method for reading the data from that entry. Remember that ZipEntry simply provides metadata about an entry whereas the stream obtained from getInputStream() method provides the actual content of the file. Finally, closeEntry() method of ZipOutputStream class is called to finish writing the entry.

Adding entries to an existing ZIP file

The AddEntries() method adds ZipEntry objects to a ZIP file. The AddEntries() method is shown below:

private static void AddEntries(ZipFile file,string[] newFiles)
{
string fileName = file.getName();
string tempFileName = Path.GetTempFileName();
ZipOutputStream destination = new ZipOutputStream
(new FileOutputStream(tempFileName));
try
{
CopyEntries(file, destination);
if (newFiles != null)
{
foreach (string f in newFiles)
{
ZipEntry z = new ZipEntry(f.Remove
  (0,Path.GetPathRoot(f).Length));
z.setMethod(ZipEntry.DEFLATED);
destination.putNextEntry(z);
try
{
FileInputStream s = new FileInputStream(f);
try
{
CopyStream(s, destination);
}
finally
{
s.close();
}
}
finally
{
destination.closeEntry();
}
}
}
}
finally
{
destination.close();
}
file.close();
System.IO.File.Copy(tempFileName, fileName, true);
System.IO.File.Delete(tempFileName);
}

The code retrieves the full path of the ZipFile by calling its getName() method. It also obtains a temporary file name using GetTempFileName() method of System.IO class. You might be wondering as to why we need a temporary file here. The AddEntries() is a helper method that will be called while creating a new ZIP file as well as while adding files to existing ZIP file. The J# compression classes do not allow you to modifying ZIP files directly. Hence, we create a new ZIP file with required items and then delete the old ZIP file. For this temporary ZIP file we need a temporary file name and hence we used the GetTempFileName() method. We then create a new ZipOutputStream object this time pointing to the temporary ZIP file. Then CopyEntries() helper method is called. The CopyEntries() helper method copies entries from specified ZIP file (first parameter) to a ZipOutputStream (second parameter). If you are creating a new ZIP file then CopyEntries() method will not copy any entries. However, if you are adding files to an existing ZIP file then it will copy all the entries from existing ZIP file to the new temporary ZIP file.

Next, a for loop adds all the files to be zipped to the ZipFile. Each zipped file is represented by a class called ZipEntry. The constructor of ZipEntry class accepts the name of the entry. The setMethod() method sets the compression method to DEFLATED. The other possibility is STORED which packages the file in un-compressed format. The newly created ZipEntry is added to the ZipOutputStream using its putNextEntry() method. A ZipEntry merely represents metadata of an entry. You still need to add actual contents of the file into the ZIP file. This is done by CopyStream() helper method.

Removing entries from an existing ZIP file

As opposite to the AddEntries() method, the RemoveEntries() method removes ZipEntry objects from a given ZIP file. The RemoveEntries() method is shown below:

private static void RemoveEntries(ZipFile file, string[] items)
{
string fileName = file.getName();
string tempFileName = Path.GetTempFileName();
ZipOutputStream destination =     new   ZipOutputStream
(new FileOutputStream(tempFileName));
try
{
List<ZipEntry> allItems = GetZippedItems(file);
List<string> filteredItems = new List<string>();
foreach (ZipEntry entry in allItems)
{
bool found = false;
foreach (string s in items)
{
if (s != entry.getName())
{
found = true;
}
}
if (found)
{
filteredItems.Add(entry.getName());
}
}
CopyEntries(file, destination,filteredItems.ToArray());
}
finally
{
destination.close();
}
file.close();
System.IO.File.Copy(tempFileName, fileName, true);
System.IO.File.Delete(tempFileName);
            
}

The RemoveEntries() method accepts the ZipFile from which entries are to be removed and an array of entry names to be removed. The code of RemoveEntries() method is very similar to AddEntries() method except that it doesn't copies specified entries. Notice the code mark in bold letters. The code essentially compares list of all the entries and list of the entries to be removed. The difference between these two lists is nothing but a list of entries to be copied. The CopyEntries() method is then called by passing the list of entries to be copied. Recollect that second overload of CopyEntries() is designed for copying only the specified entries.

Creating a new ZIP file

In order to create a new ZIP file we write a static method named CreateZipFile() inside the ZipFileHelper class. The CreateZipFile() method accepts two parameters viz. path and name of the ZIP file to be created and array of file names that are to be zipped. The CreateZipFile() method is shown below:

public static void CreateZipFile(string filename,
    string[] items)
{
FileOutputStream fout = new FileOutputStream(filename);
ZipOutputStream zout = new ZipOutputStream(fout);
zout.close();
ZipFile zipfile = new ZipFile(filename);
AddEntries(zipfile, items);
}

The code creates an instance of FileOutputStream class. The FileOutputStream class represents a stream capable of writing to a file. The constructor of FileOutputStream class accepts the path of the file to which we wish to write. This FileOutputStream instance is then supplied to an instance of ZipOutputStream class. The ZipOutputStream class represents a writable stream to a ZIP file. The ZipOutputStream is then closed causing a new empty ZIP file to create. An object of ZipFile class is then created. The ZipFile class represents a ZIP file in your code and is used to manipulate contents of the ZIP file. Finally, AddEntries() helper method is called by passing the ZipFile object and names of the files to be zipped.

Adding files to an existing ZIP file

There might be situations wherein you may wish to add files to an existing ZIP file. The AddToZipFile() method does exactly that. The AddToZipFile() method is shown below:

public static void AddToZipFile(string filename, 
     string[] items)
{
ZipFile file = new ZipFile(filename);
AddEntries(file, items);
        
}

The AddToZipFile() method accepts the path of the ZIP file and array of new files to be added. It then creates an instance of ZipFile class and calls AddEntries() method we created earlier.

Removing files from an existing ZIP file

The RemoveFromZipFile() method removes specified entries from a ZIP file. The method is shown below:

public static void RemoveFromZipFile(string filename, 
     string[] items)
{
ZipFile file = new ZipFile(filename);
RemoveEntries(file, items);
        
}

The RemoveFromZipFile() method accepts name of the ZIP file from which items are to be removed and an array of entry names that are to be removed. It then calls RemoveEntries() method by passing ZipFile and entries to be removed.

Extracting a ZIP file

Up till now you learnt to compress files into a ZIP file and modify existing ZIP files by adding or removing items from them. Now it's time to learn how to extract ZIP files. The ExtractZipFile() method is intended for doing this job and is shown below:

public static void ExtractZipFile(string zipfilename,
    string destination)
{
ZipFile zipfile = new ZipFile(zipfilename);
List<ZipEntry> entries = GetZippedItems(zipfile);
foreach (ZipEntry entry in entries)
{
if (!entry.isDirectory())
{
InputStream s = zipfile.getInputStream(entry);
try
{
string fname = System.IO.Path.GetFileName(entry.getName());
string dir=System.IO.Path.GetDirectoryName(entry.getName());
string newpath = destination + @"\" + dir;
System.IO.Directory.CreateDirectory(newpath);
FileOutputStream dest = new  FileOutputStream
(System.IO.Path.Combine(newpath, fname));
try
{
CopyStream(s, dest);
}
finally
{
dest.close();
}
}
finally
{
s.close();
}
}
}
        
}

The ExtractZipFile() method accepts path of a ZIP file to be extracted and destination folder where the files will be extracted. It then creates a ZipFile object and obtains entries within the ZIP file using GetZippedItems() helper method. The for loop iterates through all the entries. With each iteration the entry is extracted to the specified folder. The getInputStream() method of ZipFile class returns an InputStream for that entry. This stream acts as the source stream. The getName() method of ZipEntry class returns full name of the entry. Note that an entry name doesn't contain drive information for obvious reasons. Based on this entry name destination path and name of the file is calculated. Unzipping a file must create the same directory structure as present during zipping it. This is done by calling CreateDirectory() method Directory class. A FileOutputStream is then created to write the extracted file onto the disk. The CopyStream() method transfers data from source InputStream to destination FileOutputStream.

That's it! This completes our class library.

Using the class library

Using the class library is relatively easy. You simply need to call methods of ZipFileHelper class as per your requirement. For example, to create a new ZIP file you need to call CreateZipFile() method and to extract a ZIP file you need to call ExtractZipFile() method. The accompanying source code contains a Windows based client application that consumes the ZipFileHelper class we just created. Though we will not discuss the client code in any details here is how the client looks like:

image

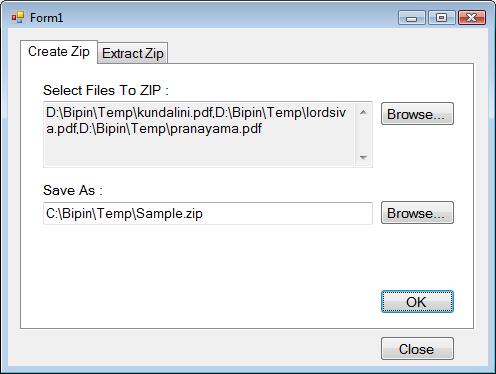
You can simply run the client and test if your class library works as expected.

Summary

C# and VB.NET do not provide any ready made solution for compressing and decompressing files programmatically. However, using J# classes you can accomplish this task. The java.utils.zip namespaces from vjslib.dll provides classes such as ZipFile, ZipEntry and ZipOutputStream that allow you to work with ZIP files. Our C# class ZipFileHelper encapsulates J# classes so that your client application need not have any J# specific class references. This way other developers not knowing J# can also use our class library for compressing and decompressing files. Moreover, you can use the class library in Windows as well as web applications.

posted Dec 8, 2016 by Shivaranjini

  Promote This Article
Facebook Share Button Twitter Share Button LinkedIn Share Button


Related Articles

Introduction

ASP.NET Forms authentication is one of the most flexible way to authenticating users. Typically under such scheme you will have user ids and passwords in some database. You will then present a form to the user that accepts the credentials. Then at server side you check whether the credentials are valid or not. Based on this validation you will display some error or success message. Forms authentication works very well with web forms. Can you use it with web services? With some tricks - Yes. In fact in this article I am going to show how to do just that. Keep reading...

Problems while using Forms Authentication with Web Services

Before understanding the problem in implementing forms authentication with web services, let us first see how forms authentication works in a typical scenarios.

  • User is presented with a web form where he can enter user id and password
  • He enters user id and password and submits the form
  • At server side, you validate the values he entered against values stored in database
  • If the authentication fails you take him to the login page again and display some error message
  • If authentication succeeds you take him to the main page of your application
  • If user tries to access a page without logging in, Forms Authentication is clever enough to redirect him to the login page automatically

As you can see, Forms Authentication greatly depends on a physical login page to accept the user credentials. You can easily provide such page in a web application. But what if you want to use it with web service application? You certainly do not have any user interface for web services. Also, you must be knowing that forms authentication works based on an authentication cookie that is passed to and from with each request made to the application. Your web service is not a part of your web application and maintaining this authentication cookie across requests in a session is problem.

Developing the web service

Now, that we are clear with the problems let us see how to solve them. The first we need to do is to make appropriate changes to web.config to enable forms authentication. The following markup shows this in detail:

  <system.web>
	<authentication mode="Forms">
		<forms name="CookieName" 
		loginUrl="service1.asmx" 
		protection="All" 
		timeout="60" path="/" />
	</authentication> 
    <authorization>
        <deny users="?" />
    </authorization>
  </system.web>

Here, we set authentication mode to "Forms" and deny access to anonymous users. Next, we will write three web methods for the web service - Login, GetLoginStatus and Logout. The names are self explanatory and need no explanation. Following code from web service code-behind file shows how the web service looks:

Public Class Service1
    Inherits System.Web.Services.WebService
    
     _
    Public Function Login(ByVal UserName As String, 
    ByVal Password As String) As Boolean
        If UserName.Length > 0 And Password.Length > 0 Then
            FormsAuthentication.SetAuthCookie(UserName, False)
            Return True
        Else
            Return False
        End If
    End Function

     _
    Public Function GetLoginStatus() As String
        If Context.User.Identity.IsAuthenticated = True Then
            Return "Logged In"
        Else
            Return "Not Logged In"
        End If
    End Function

     _
    Public Function Logout()
        If Context.User.Identity.IsAuthenticated = True Then
            FormsAuthentication.SignOut()
        End If
    End Function

Note that in each web method we set EnableSession to True. This allows us to access to the session object. In the Login method we simply call FormsAuthentication.SetAuthCookie() method passing supplied user name. Consumer of this web service must call Login() before calling any other method else he will not be allowed to consume the functionality. The GetLoginStatus() method simply returns whether user is logged into the system or not. If your web service has any other web methods then all such web methods should check Context.User.Identity.IsAuthenticated property before processing the request. The Logout() method calls FormsAuthentication.SignOut() and then onwards user will not be able to consume.

Developing the Web Service Consumer

If you are consuming the web service we developed above from a windows forms application, there are no much issues as there is no concern of 'state less' programming. However, if you want to consume this web service via ASP.NET web forms then you need to do additional things. We will now develop a client web form that shows how to do that.

We will create a web form that has three buttons - Login, Check Login Status and Logout. The Click event handler of Login button contains following code:

Dim x As New localhost.Service1()
Dim cc As New CookieContainer()
Dim sessioncookie As Cookie
Dim cookiecoll As New CookieCollection()

x.CookieContainer = cc
x.Login("user1", "password1")
cookiecoll = x.CookieContainer.GetCookies
(New Uri("http://localhost"))
Session("sessioncookie") = cookiecoll("CookieName")

Note that you need to import System.Net namespace as classes such as CookieContainer reside within it. Let us see how the code works.

  • We first create an instance of web service proxy class (x)
  • The proxy class has a property called CookieContainer. This property represents the collection of cookies that are to be passed to the web service along with the request.
  • Then we call Login() method
  • Remember that Login() method sets an authentication cookie in the response. This cookie is trapped and stored in a session variable. Note that "CookieName" is the name we used in forms tag.

Once we are logged in, we can call any other web methods. Following is the code inside the Click event of 'Check Login Status' button.

Dim x As New localhost.Service1()
Dim cc As New System.Net.CookieContainer()
Dim sessioncookie As New System.Net.Cookie()
x.CookieContainer = cc
sessioncookie = CType(Session("sessioncookie"), 
System.Net.Cookie)
If Not sessioncookie Is Nothing Then
	x.CookieContainer.Add(sessioncookie)
End If
Label1.Text = x.GetLoginStatus()

Since the web service decides whether a method call is authenticated or not based on the forms authentication cookie, we add the previously stored cookie with each method call. Then we call the actual web method. This is necessary because we are working in state less environment. The web service proxy class is created and destroyed each time the web form is processed. So, with each request you need to populate its CookieContainer again and again.

The LogOut() method works as follows:

Dim x As New localhost.Service1()
Dim cc As New System.Net.CookieContainer()
Dim sessioncookie As New System.Net.Cookie()
x.CookieContainer = cc
sessioncookie = CType(Session("sessioncookie"), 
System.Net.Cookie)
If Not sessioncookie Is Nothing Then
	x.CookieContainer.Add(sessioncookie)
End If
x.Logout()
Session.Remove("sessioncookie")

Here, the code is almost identical to the previous code snippet. However, we call LogOut() method in the end. Once we call LogOut() we also remove the reference variable from the session that points to the authentication cookie.

That's it! You have just developed forms authentication mechanism for web services. I hope you must have enjoyed reading the article. See you soon with some more interesting stuff.

READ MORE

Visual Studio 2015 provides a plethora of features that make you more productive. One such feature that beginners often miss is converting XML or JSON markup into C# classes. This article discusses this feature with a few examples.

XML and JSON are the two commonly used data formats for serializing data over the wire. Many a times you need to map XML or JSON markup to C# classes. Suppose you are developing an application that consumes some Web API or WCF service. Further assume that the service returns data as XML or JSON. When this data is received in your application you would want to read the data and store in C# object(s). Thus you need C# classes that match the structure of the XML or JSON data. No doubt, you can create these C# classes manually but Visual Studio can provided a good starting point by automating the process.

If you open any C# code file - a file with .cs extension - you will find two menu options as shown below:

image

As you can see, the Edit menu contains Paste Special sub-menu with two options - Paste JSON As Classes and Paste XML As Classes. These two menu options do the respective class creation for you. Let's see how these options work with a few examples.

Create a new Console Application project in Visuals Studio and add an XML file and a JSON file to it using Add New Item dialog. These files are merely used to generate the sample XML and JSON markup. You can also create the markup in some external editor such as Notepad.

Now open the JSON file and enter the following markup in it:

{
  "employeeid": 1,
  "firstname": "Nancy",
  "lastname": "Davolio",
  "homephone": "(206) 555-9857"
}

Then copy the above markup using Ctrl + C and then switch to the Program.cs file.

Place your cursor below the Program class and then select Paste Special > Paste JSON As Classes menu option. This will generate a C# class as shown below:

public class Rootobject
{
    public int employeeid { get; set; }
    public string firstname { get; set; }
    public string lastname { get; set; }
    public string homephone { get; set; }
}

As you can see, Rootobject class has been created for you with four public properties. The property names match the JSON key names. You can change the default class name and property names as per your needs,

Now, open the XML file and key-in the following markup:

<employee>
  <employeeid>1</employeeid>
  <firstname>Nancy</firstname>
  <lastname>Davolio</lastname>
  <homephone>(206) 555-9857</homephone>
</employee>

Repeat the above describe process, this time selecting Paste XML As Classes menu option. This will generate the following C# class:

/// <remarks/>
[System.SerializableAttribute()]
[System.ComponentModel.DesignerCategoryAttribute("code")]
[System.Xml.Serialization.XmlTypeAttribute
(AnonymousType = true)]
[System.Xml.Serialization.XmlRootAttribute
(Namespace = "", IsNullable = false)]
public partial class employee
{

    private byte employeeidField;

    private string firstnameField;

    private string lastnameField;

    private string homephoneField;

    /// <remarks/>
    public byte employeeid
    {
        get
        {
            return this.employeeidField;
        }
        set
        {
            this.employeeidField = value;
        }
    }

    /// <remarks/>
    public string firstname
    {
        get
        {
            return this.firstnameField;
        }
        set
        {
            this.firstnameField = value;
        }
    }

    /// <remarks/>
    public string lastname
    {
        get
        {
            return this.lastnameField;
        }
        set
        {
            this.lastnameField = value;
        }
    }

    /// <remarks/>
    public string homephone
    {
        get
        {
            return this.homephoneField;
        }
        set
        {
            this.homephoneField = value;
        }
    }
}

As you can see, the class generated from the XML markup is bit verbose and has XML serialization related attributes.

On. Now open the JSON file again and enter the following markup:

{
  "employees": [
    {
      "employeeid": 1,
      "firstname": "Nancy",
      "lastname": "Davolio",
      "homephone": "(206) 555-9857"
    },
    {
      "employeeid": 1,
      "firstname": "Andrew",
      "lastname": "Fuller",
      "homephone": "(206) 555-9482"
    },
    {
      "employeeid": 1,
      "firstname": "Janet",
      "lastname": "Leverling",
      "homephone": "(206) 555-3412"
    }
  ]
}

Now we have an array of objects in JSON format. If you copy-paste this array as before you will get this C# code:

public class Rootobject
{
    public Employee[] employees { get; set; }
}

public class Employee
{
    public int employeeid { get; set; }
    public string firstname { get; set; }
    public string lastname { get; set; }
    public string homephone { get; set; }
}

Now the Rootobject clas contains an array of Employee objects. The Employee class defines the four public properties as before.

Let's repeat this with XML data.

<employees>
  <employee>
    <employeeid>1</employeeid>
    <firstname>Nancy</firstname>
    <lastname>Davolio</lastname>
    <homephone>(206) 555-9857</homephone>
  </employee>
  <employee>
    <employeeid>2</employeeid>
    <firstname>Andrew</firstname>
    <lastname>Fuller</lastname>
    <homephone>(206) 555-9482</homephone>
  </employee>
  <employee>
    <employeeid>3</employeeid>
    <firstname>Janet</firstname>
    <lastname>Leverling</lastname>
    <homephone>(206) 555-3412</homephone>
  </employee>
</employees>

This time the C# code generated will be as shown below:

/// <remarks/>
[System.SerializableAttribute()]
[System.ComponentModel.
DesignerCategoryAttribute("code")]
[System.Xml.Serialization.
XmlTypeAttribute(AnonymousType = true)]
[System.Xml.Serialization.XmlRootAttribute
(Namespace = "", IsNullable = false)]
public partial class employees
{

    private employeesEmployee[] employeeField;

    /// <remarks/>
    [System.Xml.Serialization.XmlElementAttribute("employee")]
    public employeesEmployee[] employee
    {
        get
        {
            return this.employeeField;
        }
        set
        {
            this.employeeField = value;
        }
    }
}

/// <remarks/>
[System.SerializableAttribute()]
[System.ComponentModel.DesignerCategoryAttribute("code")]
[System.Xml.Serialization.
XmlTypeAttribute(AnonymousType = true)]
public partial class employeesEmployee
{

    private byte employeeidField;

    private string firstnameField;

    private string lastnameField;

    private string homephoneField;

    /// <remarks/>
    public byte employeeid
    {
        get
        {
            return this.employeeidField;
        }
        set
        {
            this.employeeidField = value;
        }
    }

    /// <remarks/>
    public string firstname
    {
        get
        {
            return this.firstnameField;
        }
        set
        {
            this.firstnameField = value;
        }
    }

    /// <remarks/>
    public string lastname
    {
        get
        {
            return this.lastnameField;
        }
        set
        {
            this.lastnameField = value;
        }
    }

    /// <remarks/>
    public string homephone
    {
        get
        {
            return this.homephoneField;
        }
        set
        {
            this.homephoneField = value;
        }
    }
}

Final example. Add the following JSON markup to the JSON file:

{
  "employeeid": 1,
  "firstname": "Nancy",
  "lastname": "Davolio",
  "phones": {
    "home": "(206) 555-9857",
    "work": "(206) 555-9482"
  }
}

This time it contains a nested phones object with two keys - home and work. Pasting this JSON into C# file will create the following code:

public class Rootobject
{
    public int employeeid { get; set; }
    public string firstname { get; set; }
    public string lastname { get; set; }
    public Phones phones { get; set; }
}

public class Phones
{
    public string home { get; set; }
    public string work { get; set; }
}

This time two classes get created - Rootobject and Phones. The Rootobject is as before whereas the Phones class contains the home and work properties.

Now enter the following XML markup that contains phones nested element:

<employee>
  <employeeid>1</employeeid>
  <firstname>Nancy</firstname>
  <lastname>Davolio</lastname>
  <phones>
    <home>(206) 555-9857</home>
    <work>(206) 555-9482</work>
  </phones>
</employee>  

Pasting the above XML markup will result in this C# code:

/// <remarks/>
[System.SerializableAttribute()]
[System.ComponentModel.
DesignerCategoryAttribute("code")]
[System.Xml.Serialization.
XmlTypeAttribute(AnonymousType = true)]
[System.Xml.Serialization.XmlRootAttribute
(Namespace = "", IsNullable = false)]
public partial class employee
{

    private byte employeeidField;

    private string firstnameField;

    private string lastnameField;

    private employeePhones phonesField;

    /// <remarks/>
    public byte employeeid
    {
        get
        {
            return this.employeeidField;
        }
        set
        {
            this.employeeidField = value;
        }
    }

    /// <remarks/>
    public string firstname
    {
        get
        {
            return this.firstnameField;
        }
        set
        {
            this.firstnameField = value;
        }
    }

    /// <remarks/>
    public string lastname
    {
        get
        {
            return this.lastnameField;
        }
        set
        {
            this.lastnameField = value;
        }
    }

    /// <remarks/>
    public employeePhones phones
    {
        get
        {
            return this.phonesField;
        }
        set
        {
            this.phonesField = value;
        }
    }
}

/// <remarks/>
[System.SerializableAttribute()]
[System.ComponentModel.
DesignerCategoryAttribute("code")]
[System.Xml.Serialization.XmlTypeAttribute
(AnonymousType = true)]
public partial class employeePhones
{

    private string homeField;

    private string workField;

    /// <remarks/>
    public string home
    {
        get
        {
            return this.homeField;
        }
        set
        {
            this.homeField = value;
        }
    }

    /// <remarks/>
    public string work
    {
        get
        {
            return this.workField;
        }
        set
        {
            this.workField = value;
        }
    }
}

The code now has two classes - employee and employeePhones

The generated C# code may not be precisely as per your expectations. But you can always adjust and fine tune the class names and property names as per your application's need. Visual Studio does provide a good starting point helping you to save good amount of work.

That's it for now! Keep coding!!

READ MORE

Introduction

In previous parts of this series (Part 1Part 2 and Part 3) we saw various techniques of encrypting the data. In this part we are going to learn how to ensure that data coming to you has not been tampered with during the transfer. The technique that we will be using is hash. Hash values allow us to verify the integrity of data. The hash value of received data can be compared to the hash value of data that was sent to check if the data is tampered.

.NET Framework classes for creating hashes

.NET Framework provides following main classes to work with hashes:

  • SHA1Managed
  • MD5CryptoServiceProvider
  • MACTripleDES

Since SHA1 is now a broken algorithm, we will use MD5CryptoServiceProvider to generate hash values.

Example

We are going to create a helper class that will help us create and verify hash values using MD5 algorithm. The class contains two methods - GetHash() and VerifyHash(). The former accepts string whose hash value is to be generated and returns the computed hash as a byte array. The later accepts the message as it was received and the hash generated previously and returns true if the message is not altered during transmit otherwise returns false.

public class MD5HashHelper
{
public byte[] GetHash(string message)
{
byte[] data;
data=System.Text.UTF8Encoding.ASCII.GetBytes(message);
MD5CryptoServiceProvider md5=new MD5CryptoServiceProvider();
return md5.ComputeHash(data,0,data.Length);
}
public bool VerifyHash(string message, byte[] hash)
{
byte[] data;
data=System.Text.UTF8Encoding.ASCII.GetBytes(message);
MD5CryptoServiceProvider md5=new MD5CryptoServiceProvider();
byte[] hashtemp=md5.ComputeHash(data,0,data.Length);
for(int x = 0; x < hash.Length;x++)
{
if (hash[x] != hashtemp[x])
{
return false;
}
}
return true;
}
}

Let's dissect the code step by step:

  • We first need to import System.Security.Cryptography namespace in your class
  • The GetHash() accepts string whose hash value is to be generated and returns the computed hash as a byte array.
  • Inside the function we used UTF8Encoding class and get aa byte representation of the string to be transfered.
  • We then create an instance of MD5CryptoServiceProvider class and call its ComputeHash by passing the byte created above to it.
  • The ComputeHash() function generates the hash for the given data and returns another byte array that represents the hash value of the data.
  • The VerifyHash() function accepts the message as it was received and the hash generated previously and returns true if the message is not altered during transmit otherwise returns false.
  • Inside this function we again use UTF8Encoding class and generate byte representation of the received message.
  • We then compute hash for this data using the same ComputeHash() method of MD5CryptoServiceProvider class.
  • Finally, we run a for loop and check each and every byte of original hash value and the hash we generated above. If both the hash values are matching we can conclude that the data is not tampered.

Download

Complete source code along with a sample usage is available for download with this article (see top).

Summary

In this example we saw how to ensure data integrity using MD5 hashing algorithm. In the next article on the series we will learn to generate digital signatures.

READ MORE
...