top button
Flag Notify
    Connect to us
      Site Registration

Site Registration

Reading And Writing XML Documents In .NET

0 votes
175 views

Introduction

ASP.NET Forms authentication is one of the most flexible way to authenticating users. Typically under such scheme you will have user ids and passwords in some database. You will then present a form to the user that accepts the credentials. Then at server side you check whether the credentials are valid or not. Based on this validation you will display some error or success message. Forms authentication works very well with web forms. Can you use it with web services? With some tricks - Yes. In fact in this article I am going to show how to do just that. Keep reading...

Problems while using Forms Authentication with Web Services

Before understanding the problem in implementing forms authentication with web services, let us first see how forms authentication works in a typical scenarios.

  • User is presented with a web form where he can enter user id and password
  • He enters user id and password and submits the form
  • At server side, you validate the values he entered against values stored in database
  • If the authentication fails you take him to the login page again and display some error message
  • If authentication succeeds you take him to the main page of your application
  • If user tries to access a page without logging in, Forms Authentication is clever enough to redirect him to the login page automatically

As you can see, Forms Authentication greatly depends on a physical login page to accept the user credentials. You can easily provide such page in a web application. But what if you want to use it with web service application? You certainly do not have any user interface for web services. Also, you must be knowing that forms authentication works based on an authentication cookie that is passed to and from with each request made to the application. Your web service is not a part of your web application and maintaining this authentication cookie across requests in a session is problem.

Developing the web service

Now, that we are clear with the problems let us see how to solve them. The first we need to do is to make appropriate changes to web.config to enable forms authentication. The following markup shows this in detail:

  <system.web>
	<authentication mode="Forms">
		<forms name="CookieName" 
		loginUrl="service1.asmx" 
		protection="All" 
		timeout="60" path="/" />
	</authentication> 
    <authorization>
        <deny users="?" />
    </authorization>
  </system.web>

Here, we set authentication mode to "Forms" and deny access to anonymous users. Next, we will write three web methods for the web service - Login, GetLoginStatus and Logout. The names are self explanatory and need no explanation. Following code from web service code-behind file shows how the web service looks:

Public Class Service1
    Inherits System.Web.Services.WebService
    
     _
    Public Function Login(ByVal UserName As String, 
    ByVal Password As String) As Boolean
        If UserName.Length > 0 And Password.Length > 0 Then
            FormsAuthentication.SetAuthCookie(UserName, False)
            Return True
        Else
            Return False
        End If
    End Function

     _
    Public Function GetLoginStatus() As String
        If Context.User.Identity.IsAuthenticated = True Then
            Return "Logged In"
        Else
            Return "Not Logged In"
        End If
    End Function

     _
    Public Function Logout()
        If Context.User.Identity.IsAuthenticated = True Then
            FormsAuthentication.SignOut()
        End If
    End Function

Note that in each web method we set EnableSession to True. This allows us to access to the session object. In the Login method we simply call FormsAuthentication.SetAuthCookie() method passing supplied user name. Consumer of this web service must call Login() before calling any other method else he will not be allowed to consume the functionality. The GetLoginStatus() method simply returns whether user is logged into the system or not. If your web service has any other web methods then all such web methods should check Context.User.Identity.IsAuthenticated property before processing the request. The Logout() method calls FormsAuthentication.SignOut() and then onwards user will not be able to consume.

Developing the Web Service Consumer

If you are consuming the web service we developed above from a windows forms application, there are no much issues as there is no concern of 'state less' programming. However, if you want to consume this web service via ASP.NET web forms then you need to do additional things. We will now develop a client web form that shows how to do that.

We will create a web form that has three buttons - Login, Check Login Status and Logout. The Click event handler of Login button contains following code:

Dim x As New localhost.Service1()
Dim cc As New CookieContainer()
Dim sessioncookie As Cookie
Dim cookiecoll As New CookieCollection()

x.CookieContainer = cc
x.Login("user1", "password1")
cookiecoll = x.CookieContainer.GetCookies
(New Uri("http://localhost"))
Session("sessioncookie") = cookiecoll("CookieName")

Note that you need to import System.Net namespace as classes such as CookieContainer reside within it. Let us see how the code works.

  • We first create an instance of web service proxy class (x)
  • The proxy class has a property called CookieContainer. This property represents the collection of cookies that are to be passed to the web service along with the request.
  • Then we call Login() method
  • Remember that Login() method sets an authentication cookie in the response. This cookie is trapped and stored in a session variable. Note that "CookieName" is the name we used in forms tag.

Once we are logged in, we can call any other web methods. Following is the code inside the Click event of 'Check Login Status' button.

Dim x As New localhost.Service1()
Dim cc As New System.Net.CookieContainer()
Dim sessioncookie As New System.Net.Cookie()
x.CookieContainer = cc
sessioncookie = CType(Session("sessioncookie"), 
System.Net.Cookie)
If Not sessioncookie Is Nothing Then
	x.CookieContainer.Add(sessioncookie)
End If
Label1.Text = x.GetLoginStatus()

Since the web service decides whether a method call is authenticated or not based on the forms authentication cookie, we add the previously stored cookie with each method call. Then we call the actual web method. This is necessary because we are working in state less environment. The web service proxy class is created and destroyed each time the web form is processed. So, with each request you need to populate its CookieContainer again and again.

The LogOut() method works as follows:

Dim x As New localhost.Service1()
Dim cc As New System.Net.CookieContainer()
Dim sessioncookie As New System.Net.Cookie()
x.CookieContainer = cc
sessioncookie = CType(Session("sessioncookie"), 
System.Net.Cookie)
If Not sessioncookie Is Nothing Then
	x.CookieContainer.Add(sessioncookie)
End If
x.Logout()
Session.Remove("sessioncookie")

Here, the code is almost identical to the previous code snippet. However, we call LogOut() method in the end. Once we call LogOut() we also remove the reference variable from the session that points to the authentication cookie.

That's it! You have just developed forms authentication mechanism for web services. I hope you must have enjoyed reading the article. See you soon with some more interesting stuff.

posted Dec 30, 2016 by Shivaranjini

  Promote This Article
Facebook Share Button Twitter Share Button LinkedIn Share Button


Related Articles

Visual Studio 2015 provides a plethora of features that make you more productive. One such feature that beginners often miss is converting XML or JSON markup into C# classes. This article discusses this feature with a few examples.

XML and JSON are the two commonly used data formats for serializing data over the wire. Many a times you need to map XML or JSON markup to C# classes. Suppose you are developing an application that consumes some Web API or WCF service. Further assume that the service returns data as XML or JSON. When this data is received in your application you would want to read the data and store in C# object(s). Thus you need C# classes that match the structure of the XML or JSON data. No doubt, you can create these C# classes manually but Visual Studio can provided a good starting point by automating the process.

If you open any C# code file - a file with .cs extension - you will find two menu options as shown below:

image

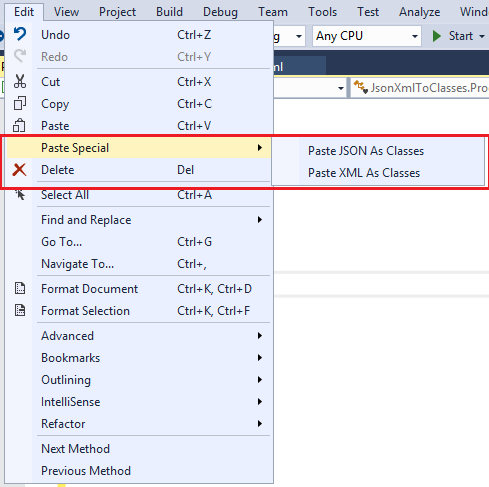
As you can see, the Edit menu contains Paste Special sub-menu with two options - Paste JSON As Classes and Paste XML As Classes. These two menu options do the respective class creation for you. Let's see how these options work with a few examples.

Create a new Console Application project in Visuals Studio and add an XML file and a JSON file to it using Add New Item dialog. These files are merely used to generate the sample XML and JSON markup. You can also create the markup in some external editor such as Notepad.

Now open the JSON file and enter the following markup in it:

{
  "employeeid": 1,
  "firstname": "Nancy",
  "lastname": "Davolio",
  "homephone": "(206) 555-9857"
}

Then copy the above markup using Ctrl + C and then switch to the Program.cs file.

Place your cursor below the Program class and then select Paste Special > Paste JSON As Classes menu option. This will generate a C# class as shown below:

public class Rootobject
{
    public int employeeid { get; set; }
    public string firstname { get; set; }
    public string lastname { get; set; }
    public string homephone { get; set; }
}

As you can see, Rootobject class has been created for you with four public properties. The property names match the JSON key names. You can change the default class name and property names as per your needs,

Now, open the XML file and key-in the following markup:

<employee>
  <employeeid>1</employeeid>
  <firstname>Nancy</firstname>
  <lastname>Davolio</lastname>
  <homephone>(206) 555-9857</homephone>
</employee>

Repeat the above describe process, this time selecting Paste XML As Classes menu option. This will generate the following C# class:

/// <remarks/>
[System.SerializableAttribute()]
[System.ComponentModel.DesignerCategoryAttribute("code")]
[System.Xml.Serialization.XmlTypeAttribute
(AnonymousType = true)]
[System.Xml.Serialization.XmlRootAttribute
(Namespace = "", IsNullable = false)]
public partial class employee
{

    private byte employeeidField;

    private string firstnameField;

    private string lastnameField;

    private string homephoneField;

    /// <remarks/>
    public byte employeeid
    {
        get
        {
            return this.employeeidField;
        }
        set
        {
            this.employeeidField = value;
        }
    }

    /// <remarks/>
    public string firstname
    {
        get
        {
            return this.firstnameField;
        }
        set
        {
            this.firstnameField = value;
        }
    }

    /// <remarks/>
    public string lastname
    {
        get
        {
            return this.lastnameField;
        }
        set
        {
            this.lastnameField = value;
        }
    }

    /// <remarks/>
    public string homephone
    {
        get
        {
            return this.homephoneField;
        }
        set
        {
            this.homephoneField = value;
        }
    }
}

As you can see, the class generated from the XML markup is bit verbose and has XML serialization related attributes.

On. Now open the JSON file again and enter the following markup:

{
  "employees": [
    {
      "employeeid": 1,
      "firstname": "Nancy",
      "lastname": "Davolio",
      "homephone": "(206) 555-9857"
    },
    {
      "employeeid": 1,
      "firstname": "Andrew",
      "lastname": "Fuller",
      "homephone": "(206) 555-9482"
    },
    {
      "employeeid": 1,
      "firstname": "Janet",
      "lastname": "Leverling",
      "homephone": "(206) 555-3412"
    }
  ]
}

Now we have an array of objects in JSON format. If you copy-paste this array as before you will get this C# code:

public class Rootobject
{
    public Employee[] employees { get; set; }
}

public class Employee
{
    public int employeeid { get; set; }
    public string firstname { get; set; }
    public string lastname { get; set; }
    public string homephone { get; set; }
}

Now the Rootobject clas contains an array of Employee objects. The Employee class defines the four public properties as before.

Let's repeat this with XML data.

<employees>
  <employee>
    <employeeid>1</employeeid>
    <firstname>Nancy</firstname>
    <lastname>Davolio</lastname>
    <homephone>(206) 555-9857</homephone>
  </employee>
  <employee>
    <employeeid>2</employeeid>
    <firstname>Andrew</firstname>
    <lastname>Fuller</lastname>
    <homephone>(206) 555-9482</homephone>
  </employee>
  <employee>
    <employeeid>3</employeeid>
    <firstname>Janet</firstname>
    <lastname>Leverling</lastname>
    <homephone>(206) 555-3412</homephone>
  </employee>
</employees>

This time the C# code generated will be as shown below:

/// <remarks/>
[System.SerializableAttribute()]
[System.ComponentModel.
DesignerCategoryAttribute("code")]
[System.Xml.Serialization.
XmlTypeAttribute(AnonymousType = true)]
[System.Xml.Serialization.XmlRootAttribute
(Namespace = "", IsNullable = false)]
public partial class employees
{

    private employeesEmployee[] employeeField;

    /// <remarks/>
    [System.Xml.Serialization.XmlElementAttribute("employee")]
    public employeesEmployee[] employee
    {
        get
        {
            return this.employeeField;
        }
        set
        {
            this.employeeField = value;
        }
    }
}

/// <remarks/>
[System.SerializableAttribute()]
[System.ComponentModel.DesignerCategoryAttribute("code")]
[System.Xml.Serialization.
XmlTypeAttribute(AnonymousType = true)]
public partial class employeesEmployee
{

    private byte employeeidField;

    private string firstnameField;

    private string lastnameField;

    private string homephoneField;

    /// <remarks/>
    public byte employeeid
    {
        get
        {
            return this.employeeidField;
        }
        set
        {
            this.employeeidField = value;
        }
    }

    /// <remarks/>
    public string firstname
    {
        get
        {
            return this.firstnameField;
        }
        set
        {
            this.firstnameField = value;
        }
    }

    /// <remarks/>
    public string lastname
    {
        get
        {
            return this.lastnameField;
        }
        set
        {
            this.lastnameField = value;
        }
    }

    /// <remarks/>
    public string homephone
    {
        get
        {
            return this.homephoneField;
        }
        set
        {
            this.homephoneField = value;
        }
    }
}

Final example. Add the following JSON markup to the JSON file:

{
  "employeeid": 1,
  "firstname": "Nancy",
  "lastname": "Davolio",
  "phones": {
    "home": "(206) 555-9857",
    "work": "(206) 555-9482"
  }
}

This time it contains a nested phones object with two keys - home and work. Pasting this JSON into C# file will create the following code:

public class Rootobject
{
    public int employeeid { get; set; }
    public string firstname { get; set; }
    public string lastname { get; set; }
    public Phones phones { get; set; }
}

public class Phones
{
    public string home { get; set; }
    public string work { get; set; }
}

This time two classes get created - Rootobject and Phones. The Rootobject is as before whereas the Phones class contains the home and work properties.

Now enter the following XML markup that contains phones nested element:

<employee>
  <employeeid>1</employeeid>
  <firstname>Nancy</firstname>
  <lastname>Davolio</lastname>
  <phones>
    <home>(206) 555-9857</home>
    <work>(206) 555-9482</work>
  </phones>
</employee>  

Pasting the above XML markup will result in this C# code:

/// <remarks/>
[System.SerializableAttribute()]
[System.ComponentModel.
DesignerCategoryAttribute("code")]
[System.Xml.Serialization.
XmlTypeAttribute(AnonymousType = true)]
[System.Xml.Serialization.XmlRootAttribute
(Namespace = "", IsNullable = false)]
public partial class employee
{

    private byte employeeidField;

    private string firstnameField;

    private string lastnameField;

    private employeePhones phonesField;

    /// <remarks/>
    public byte employeeid
    {
        get
        {
            return this.employeeidField;
        }
        set
        {
            this.employeeidField = value;
        }
    }

    /// <remarks/>
    public string firstname
    {
        get
        {
            return this.firstnameField;
        }
        set
        {
            this.firstnameField = value;
        }
    }

    /// <remarks/>
    public string lastname
    {
        get
        {
            return this.lastnameField;
        }
        set
        {
            this.lastnameField = value;
        }
    }

    /// <remarks/>
    public employeePhones phones
    {
        get
        {
            return this.phonesField;
        }
        set
        {
            this.phonesField = value;
        }
    }
}

/// <remarks/>
[System.SerializableAttribute()]
[System.ComponentModel.
DesignerCategoryAttribute("code")]
[System.Xml.Serialization.XmlTypeAttribute
(AnonymousType = true)]
public partial class employeePhones
{

    private string homeField;

    private string workField;

    /// <remarks/>
    public string home
    {
        get
        {
            return this.homeField;
        }
        set
        {
            this.homeField = value;
        }
    }

    /// <remarks/>
    public string work
    {
        get
        {
            return this.workField;
        }
        set
        {
            this.workField = value;
        }
    }
}

The code now has two classes - employee and employeePhones

The generated C# code may not be precisely as per your expectations. But you can always adjust and fine tune the class names and property names as per your application's need. Visual Studio does provide a good starting point helping you to save good amount of work.

That's it for now! Keep coding!!

READ MORE
...