top button
Flag Notify
    Connect to us
      Site Registration

Site Registration

Extensible Markup Language (XML)

0 votes
771 views

 Extensible Markup Language (XML) is a markup language that defines a set of rules for encoding documents in a format that is both human-readable and machine readable.

The design goals of XML emphasize simplicity, generality, and usability across the Internet. It is a textual data format with strong support via Unicode for different human languages.

Although the design of XML focuses on documents, the language is widely used for the representation of arbitrary data structures such as those used in web services.

XML is mainly designed to carry (or transmit) data, not to display data. XML tags are not predefine, user can define their own tags.

Example:

<root>
         <child>
               <subchild>...........</subchild>
          </child>
</root>                               

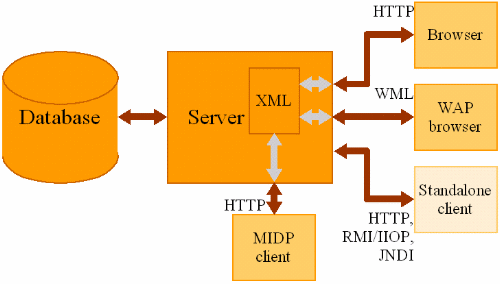
XML Architecture :
CDATA & PCDATA :

By default, all text inside an XML document is parsed. But text inside a CDATA section will be ignored by the parser.

PCDATA - Parsed Character Data

XML parsers normally parse all the text in an XML document. When an XML element is parsed, the text between the XML tags is also parsed:

  <message>This text is also parsed</message>

The parser does this because XML elements can contain other elements, as in this example, where the <name> element contains two other elements (first and last):

Example:               

<name>
          <first>Bill</first>
           <last>Gates</last>
</name>

CDATA - (Unparsed) Character Data

The term CDATA is used about text data that should not be parsed by the XML parser.  Everything inside a CDATA section is ignored by the parser. To avoid errors, script code can be defined as CDATA.

A CDATA section starts with  "<![CDATA["  and ends with  "]]>"

Example:

<child>

<![CDATA[

function matchtwo(a,b)

     {

       if (a < b && a < 0 ) then

                 {

                  return 1;

               }

      else

             {

             return 0;

           }

   }

]]>

</child>

Document Type Definations :

A set of structural rules called declarations, which specify a set of elements that can appear in the document as well as how and where these elements may appear.

Purpose of DTD to provide a standard form for a collection of XML documents. Not all XML documents have or need a DTD.

Types of DTD:

There are two types of DTD. They are

Internal DTD (appears within a XML document)

External DTD (appears as a external file – can be used with more than one document)

Declaring Elements within DTD:

DTD contains declarations that define elements, attributes, etc.

Syntax:

<!ELEMENT element-name (element-content)>

Example:

<!ELEMENT person(parent, age, spouse, sibling)>         

Declaring Empty Elements within DTD:

Empty elements are declared with the keyword -  EMPTY

Syntax:

<!ELEMENT element-name EMPTY>

<!ELEMENT br EMPTY>

XML Namespaces :

XML Namespaces provide a method to avoid element name conflicts. To use XML Namespaces, elements are given qualified names.

In XML, element names are defined by the developer. This often results in a conflict when trying to mix XML documents from different XML applications.

For example, this file carries HTML table information:

<table>
     <tr>
          <td>Apples</td>
           <td>Bananas</td>
      </tr>

</table>

Whereas this XML file carries user defined tags:

<table>
              <name>African Coffee Table</name>
               <width>80</width>
              <length>120</length>

</table>

If these two files were added together, there would be a name conflict. Both contain a <table> element, but the elements have different content and meaning. An XML parser will not know how to handle these differences.

Solving the name conflict using a prefix. Name conflicts in XML can easily be avoided using a name prefix.

Example :

<h:table>
       <h:tr>
                <h:td>Apples</h:td>
               <h:td>Bananas</h:td>
      </h:tr>
</h:table>


<f:table>
             <f:name>African Coffee Table</f:name>
             <f:width>80</f:width>
            <f:length>120</f:length>
</f:table>

The xmlns Attribute:

When using prefixes in XML, a so-called namespace for the prefix must be defined. The namespace is defined by the xmlns attribute in the start tag of an element.      

Syntax :       

xmlns:prefix=“URI”

Example :

<root>

       <h:table xmlns:h="http://www.w3.org/1999/xhtml/">
             <h:tr>
                    <h:td>Apples</h:td>
                   <h:td>Bananas</h:td>
            </h:tr>
        </h:table>

    <f:table xmlns:f="http://www.myschools.com/furniture">
                <f:name>African Coffee Table</f:name>
                <f:width>80</f:width>
                <f:length>120</f:length>
    </f:table>

</root>  

Applications of XML:

Hundreds of document formats using XML syntax have been developed, including RSS, Atom, SOAP, SVG, and XHTML. XML-based formats have become the default for many office-productivity tools, including Microsoft Office (Office Open XML), OpenOffice.org and LibreOffice (OpenDocument), and Apple's iWork.

XML has come into common use for the interchange of data over the Internet. IETF RFC 7303 gives rules for the construction of Internet Media Types for use when sending XML. It also defines the media types application/xml and text/xml, which say only that the data is in XML, and nothing about its semantics.

posted Mar 23, 2017 by Naveen Kumar

  Promote This Article
Facebook Share Button Twitter Share Button LinkedIn Share Button


Related Articles


JSON vs. XML

Both JSON and XML are capable of representing in-memory data in a readable textual format. Similarly, both of them are isomorphic, which means an equivalent one of the given piece of text is possible in the other format. For instance, while invoking a public Web service, a developer can state in the query string parameter whether the output should be in XML or JSON format.

Due to such similarities, it might not be simple to choose a suitable data exchange format from the two. This is where it is essential to consider the differentiating characteristics or both the formats and find out which one is more suitable for a particular application.

Compares the major characteristics of both formats.

Characteristic

JSON

XML

Data Types

Offers scalar data types and articulates structured data in the form of objects and arrays

  Does not offer any idea of data types due to which relying on XML Schema is essential for specifying information about the data types.

Array Support

Provides native support

  Expresses array by conventions. For instance, XML employs an outer placeholder element that forms the content in an array as inner elements.

Object Support

Provides native support

  Expresses objects by conventions, usually by combining attributes and elements.

Null Support

Recognizes the value natively.

  Mandates the use of xsi:nil on elements in an instance document along with the import of the related namespace.

Comments

Does not support

  Provides native support (via APIs).

Namespaces

Does not support namespaces and that naming collisions do not occur, as objects are nested or the object member name has a prefix.

  Accepts namespaces to prevent name collisions and safely extent the prevalent XML standards.

Formatting

Is simple and offers more direct data mapping

  It complex and needs more effort for mapping application types to elements.

Size

Has very short syntax, which gives formatted text wherein most space is taken up by the represented data.

  Has lengthy documents, particularly in case of element-centric formatting.

Parsing in JavaScript

Has very short syntax, which gives formatted text wherein most space is taken up by the represented data.

  Has lengthy documents, particularly in case of element-centric formatting.

Parsing in JavaScript

Needs no additional application for parsing (JavaScript’s eval() function work well ).

  Implements XML DOM and requires extra code for mapping text to JavaScript objects.

Parsing

Has JSONPath for selecting specific sections of the data structure but is not widely used.

  Has XPath specification for doing the same in an XML document and is widely used.


Learning Curve

Is not sleep at all, due to familiarity with the structure and the underlying dynamic programming language.

  Is steep with the need to know several technologies and concepts such as XPath, XSL Transformations (XSLT), DOM, Schema, and Namespaces.

Complexity

Is complex

  Is more complex.

Schema (Metadata)

Has a schema but is not widely used.

  Used many specifications    for defining a schema,        including XML Schema      Definition (XSD) and Document Type Definition (DTD)

Styling

Has no special specification.

  Has XSLT specification for  styling an XML document.

Security

Is less secure, as the browser has no JSON parser.

  Is more secure.

READ MORE

There are many different techniques to use by which you can create an XML document in C#. One of them is LINQ to XML which we are going to discuss in this article.

Let’s say we need to create an XML as below:

  1. <?xml version="1.0" encoding="UTF-8"?>  
  2. <Parent>  
  3. <Header>  
  4. <FileDetails>  
  5. <FileName>RandomFile</FileName>  
  6. <FileVersion>1.0</FileVersion>  
  7. </FileDetails>  
  8. </Header>  
  9. <Body>  
  10. <Infos>  
  11. <Info Type="Information1">This is Information1</Info>  
  12. <Info Type="Information2">This is Information2</Info>  
  13. </Infos>  
  14. <Users>  
  15. <UserDetails>  
  16. <Name>  
  17. <FirstName>Vipul</FirstName>  
  18.  <MiddleName/>  
  19.                     <LastName>Malhotra</LastName>  
  20.                 </Name>  
  21. <DateOfBirth>12-Apr-1990</DateOfBirth>  
  22. </UserDetails>  
  23. </Users>  
  24. </Body>  

Let’s break the creation of the file in two parts so as to be able to see more features.

We will first create the below Xml:

  1. <?xml version="1.0" encoding="UTF-8"?>  
  2. <Parent>  
  3. <Header>  
  4. <FileDetails>  
  5. <FileName>RandomFile</FileName>  
  6. <FileVersion>1.0</FileVersion>  
  7. </FileDetails>  
  8. </Header>  
  9. <Body>  
  10. <Infos>  
  11. <Info Type="Information1">This is Information1</Info>  
  12. <Info Type="Information2">This is Information2</Info>  
  13. </Infos>  
  14. </Body>  

In order to create this, we will first define an XDocument with the parent root as below:

  1. XDocument doc = new XDocument(new XElement("Parent"));  

After this, we will use this “doc” as the root of the file and will writing nested XElement to it.

Let’s first create the Header portion of the xml.
Header
Please notice that the XElement “Header “ is added as a new element and the further elements are added as nested to this “Header” element. It is due to the reason that the elements are sub-elements of “Header”. Further “FileName” and “FileVersion” element is a sub-element of “FileDetails”

In the same way, we would add another section to the root of the doc. This section would be “Body”. 

The code for the same would be as:
code
This follows the same logic that “Body” is also sub-node of the root “parent” and so it is added directly to the root. Whereas , the element “Infos” is sub-element of “Body” and is so added in the way above. Same goes for “Info” which is a further sub-element of “Infos”. 

Also notice how an attribute is added to each of the “Info” element using XAttribute.

After this, we further need to add the below section as sub-nodes of “Body” and not the root of the application:

  1. <Users>  
  2. <UserDetails>  
  3. <Name>  
  4. <FirstName>Vipul</FirstName>  
  5.  <MiddleName/>  
  6.                     <LastName>Malhotra</LastName>  
  7.                 </Name>  
  8. <DateOfBirth>12-Apr-1990</DateOfBirth>  
  9. </UserDetails>  
  10. </Users>  

In order to do that, we would make sure that the code starts appending the code inside the “Body” tag of the already created xml.

Using XDocument, we can search for the node “Body” and then start adding node XElements to it .
node 
Searching a node Is done using:

Further adding more elements to it is done using the below code:
code
The logic behind the hierarchy is the same as that discussed above.

The code can also be used inside a loop in case we need to add many similar sections to a particular node. Like in this case there can be many users and all of their details would have to be added in different UserDetails section inside the “Body” node.

READ MORE

Introduction

In today's tech world, most of the applications being developed under Logistics, Inventory, Internal Transaction and other domains require day-to-day data in excel files and prefer excel file operations in their applications.

I will be sharing one of the Nuget Package tools which, with very minimal lines of code, will export an excel file for us.

The Tool is Closed XML.

Just write a few lines of code and done! It is developer friendly. If we have used the Open XML, there are a lot of lines of code which are required to export an excel from data. We can create an excel file of 2007/2010 configuration without an Excel application.

To add the closed XML package, we add it directly through the user interface from the Nuget Gallery and also, we can use the Package Manager console to add the package using the below command

PM> Install-Package ClosedXML

Snippet

  1. DataTable dt = new DataTable();  
  2. dt.Columns.AddRange(new DataColumn[3]  
  3. {  
  4.  new DataColumn("Id", typeof(int)), new DataColumn("Name", typeof(string)), new DataColumn("Country", typeof(string))  
  5. });  
  6. dt.Rows.Add(1, "C Sharp corner", "United States");  
  7. dt.Rows.Add(2, "Suraj", "India");  
  8. dt.Rows.Add(3, "Test User", "France");  
  9. dt.Rows.Add(4, "Developer", "Russia"); //Exporting to Excel               
  10. string folderPath = "C:\\Excel\\";              
  11. if (!Directory.Exists(folderPath))              
  12. {                   
  13.     Directory.CreateDirectory(folderPath);            
  14. }     
  15. //Codes for the Closed XML             
  16.     using (XLWorkbook wb = new XLWorkbook())              
  17.     {                
  18.         wb.Worksheets.Add(dt, "Customers");                  
  19.         //wb.SaveAs(folderPath + "DataGridViewExport.xlsx");                
  20.         string myName = Server.UrlEncode("Test" + "_" + DateTime.Now.ToShortDateString() + ".xlsx");        
  21.         MemoryStream stream = GetStream(wb);  
  22.         // The method is defined below             
  23.         Response.Clear();                  
  24.         Response.Buffer = true;              
  25.         Response.AddHeader("content-disposition", "attachment; filename=" + myName);         
  26.         Response.ContentType = "application/vnd.ms-excel";           
  27.         Response.BinaryWrite(stream.ToArray());                
  28.         Response.End();  
  29.     }  

The above code instantiates a data table, with few data initializations.

  1. public MemoryStream GetStream(XLWorkbook excelWorkbook)   
  2. {  
  3.     MemoryStream fs = new MemoryStream();  
  4.     excelWorkbook.SaveAs(fs);  
  5.     fs.Position = 0;  
  6.     return fs;  
  7. }

We are using this method, so as to return a stream in order to download the file in response to using the stream. The save as method of the Closed XML helps create the stream.

Downloaded file looks like below,

file

READ MORE
  1. XML document has a single root node.
  2. The tree is a general ordered tree.
  3. A parent node may have any number of children.
  4. Child nodes are ordered and may have siblings.
  5. Preorder traversals are usually used to get the information, out of the tree.

Trees

Simple XML Document

  1. <?xml version = “1.0” ?> <address>  
  2. <name>  
  3. <first>Alice</first></br>  
  4. <last>Lee</last></br>  
  5. </name>  
  6. <email>alee@aol.com</email></br>  
  7. <phone>123-45-6789</phone></br>  
  8. <birthday>  
  9. <year>1983</year></br>  
  10. <month>07</month></br>  
  11. <day>15</day>  
  12. </birthday>  
  13. </address>  

Program Demo 

Write the code from XMLCopyEditor.

Save Any Location(EX:Sample.xml). 

code

Output

Output


READ MORE
...