At times you want to accept user input in your web applications by presenting them with a wizard driven user interface. A wizard driven user interface allows you to logically divide and group pieces of information so that user can fill them up easily in step-by-step manner. While creating a wizard is easy in ASP.NET Web Forms applications, you need to implement it yourself in ASP.NET MVC applications. There are more than one approaches to creating a wizard in ASP.NET MVC and this article shows one of them. In Part 1 of this article you will develop a wizard that stores its data in ASP.NET Session and the wizard works on traditional form submission.
To develop a wizard in ASP.NET MVC you will use the following approach:
- Each wizard step will have an action method in the controller and a view.
- The data accepted in each wizard step is stored in a view model class designed for that step.
- All the action methods for wizard steps will accept three parameters - step's view model object and two string parameters indicating the Next / Previous status.
- The action methods mentioned above grab the data from view model object and store it in Session till the final step.
- The action methods return a view for the next step if Next button is clicked. If Previous button is clicked they return a view for the previous step and they return the same view if there are any model validation errors.
- Model validations are checked only when Next button is clicked.
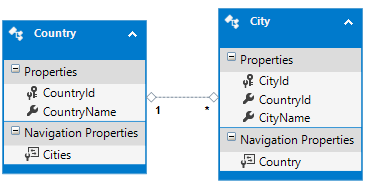
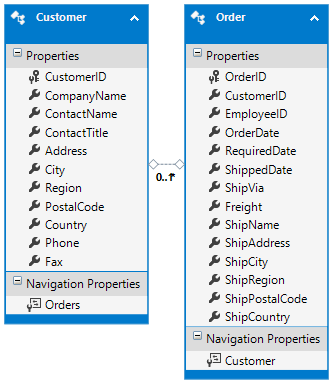
Now that you have some idea about the approach we will be taking for developing a wizard, let's create a sample application that illustrates how this approach can be implemented. Begin by creating a new ASP.NET MVC application based on Empty template. Then right click on the Models folder and add an ADO.NET Entity Data Model for the Customers table of Northwind database. The following figure shows the Customer model class in the designer.
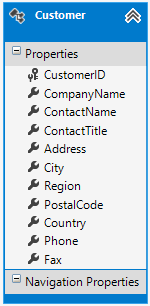
As you can see the Customer class has several properties. For the sake of creating the wizard let's group them in three steps as follows:
- Basic Details : Customer ID, CompanyName
- Address Details : Address, City, Country, PostalCode
- Contact Details : ContactName, Phone, Fax
Note that a few properties have been omitted from the wizard just to keep things tidy.
You need to create a view model class for each of the wizard steps outlined above. So, you need to add BasicDetails, AddressDetails and ContactDetails classes to the Models folder. These are simple POCOs as shown below:
public class BasicDetails
{
[Required]
public string CustomerID { get; set; }
[Required]
[StringLength(30)]
public string CompanyName { get; set; }
}public class AddressDetails
{
[Required]
public string Address { get; set; }
[Required]
public string City { get; set; }
[Required]
public string Country { get; set; }
[Required]
public string PostalCode { get; set; }
}public class ContactDetails
{
[Required]
public string ContactName { get; set; }
[Required]
public string Phone { get; set; }
[Required]
public string Fax { get; set; }
}As you can see the three classes namely BasicDetails, AddressDetails and ContactDetails contain only those properties that are relevant to the corresponding wizard step. Additionally, they use data annotations for basic validations. You can add more data annotations as per your requirement. For this example, the above attributes are sufficient.
Now, add HomeController to the Controllers folder. The HomeController contains five methods in all - Index(), GetCustomer(), RemoveCustomer(), BasicDetails(), AddressDetails() and ContactDetails(). The Index() action method and GetCustomers() / RemoveCustomer() helper methods are shown below:
public ActionResult Index()
{
return View("BasicDetails");
}
private Customer GetCustomer()
{
if (Session["customer"] == null)
{
Session["customer"] = new Customer();
}
return (Customer)Session["customer"];
}
private void RemoveCustomer()
{
Session.Remove("customer");
}The Index() action method simply returns a view that represents the first step of the wizard - BasicDetails. The GetCustomer() helper method does the job of retrieving a Customer object from Session and return it to the caller. The GetCustomer() method first checks whether a Customer object is stored in the Session or not. If Customer object exists that object is returned, otherwise a new Customer object is created and stored in the Session with a key customer. The RemoveCustomer() method simply removes the customer key and associated Customer object from the Session.
Each wizard step has an action method. Since this example has three wizard steps you need to add three action methods. The BasicDetails() action method is shown below:
[HttpPost]
public ActionResult BasicDetails(BasicDetails data,
string prevBtn, string nextBtn)
{
if (nextBtn != null)
{
if (ModelState.IsValid)
{
Customer obj = GetCustomer();
obj.CustomerID = data.CustomerID;
obj.CompanyName = data.CompanyName;
return View("AddressDetails");
}
}
return View();
}The BasicDetails() action method accepts three parameters - BasicDetails object, prevBtn and nextBtn. The BasicDetails view posts the form to BasicDetails action method and hence it is marked with [HttpPost] attribute. The three parameters of BasicDetails() action method are passed in by the default model binding process of ASP.NET MVC. The BasicDetails object contains the values of CustomerID and CompanyName as entered on the BasicDetails view. Inside the BasicDetails() action method you need to know which of the two buttons (Next / Previous) was clicked by the user. That's why the two string parameters prevBtn and nextBtn are used. If prevBtn or nextBtn is not null it indicates it indicates that the button was clicked. The BasicDetails view doesn't have Previous button since it is the first step of the wizard. The BasicDetails() still accepts prevBtn parameter for the sake of consistency with other wizard step methods.
Inside, the code checks the ModelState.IsValid property to determine whether the the model contains valid data. If IsValid returns true GetCustomer() is called to retrieve the Customer object from the Session. The CustomerID and CompanyName properties of the Customer object are set with the corresponding properties of BasicDetails object and AddressDetails view is returned. If there are any model validation errors the BasicDetails view will be returned.
The AddressDetails() method works on the similar lines as that of BasicDetails() and is shown below:
[HttpPost]
public ActionResult AddressDetails(AddressDetails data,
string prevBtn, string nextBtn)
{
Customer obj = GetCustomer();
if (prevBtn!=null)
{
BasicDetails bd = new BasicDetails();
bd.CustomerID = obj.CustomerID;
bd.CompanyName = obj.CompanyName;
return View("BasicDetails",bd);
}
if (nextBtn != null)
{
if (ModelState.IsValid)
{
obj.Address = data.Address;
obj.City = data.City;
obj.Country = data.Country;
obj.PostalCode = data.PostalCode;
return View("ContactDetails");
}
}
return View();
}The AddressDetails view has Previous as well as Next button and posts to AddressDetails() action method. The AddressDetails() method accepts AddressDetails object and prevBtn and nextBtn parameters. If the Previous button was clicked, the code prepares an instance of BasicDetails object and populates its CustomerID and CompanyName properties from the Customer object from Session. The code then returns BasicDetails view with BasicDetails object as its model. This way user is taken to the previous step of the wizard.
Then the code checks whether Next button was clicked. If so, IsValid property of ModelState is checked as before. If there are no model validation errors data from AddressDetails object is stored in the Customer object from the Session. The code then return ContactDetails view.
The ContactDetails() action method does the job of saving the newly added Customer to the database and is shown below:
[HttpPost]
public ActionResult ContactDetails(ContactDetails data,
string prevBtn, string nextBtn)
{
Customer obj = GetCustomer();
if (prevBtn != null)
{
AddressDetails ad = new AddressDetails();
ad.Address = obj.Address;
ad.City = obj.City;
ad.Country = obj.Country;
ad.PostalCode = obj.PostalCode;
return View("AddressDetails", ad);
}
if (nextBtn != null)
{
if (ModelState.IsValid)
{
obj.ContactName = data.ContactName;
obj.Phone = data.Phone;
obj.Fax = data.Fax;
NorthwindEntities db = new NorthwindEntities();
db.Customers.Add(obj);
db.SaveChanges();
RemoveCustomer();
return View("Success");
}
}
return View();
}The ContactDetails view posts to the ContactDetails() action method. The ContactDetails() action method accepts ContactDetails object and prevBtn and nextBtn parameters. As before, it checks whether the Previous button was clicked. If so, a new instance of AddressDetails class is created and is filled with the data from Customer object from the Session. The code then returns AddressView by passing AddressDetails object as its model.
If user clicks on Next button, model is checked for any validation errors using IsValid property. If there are no validation errors properties of Customer object stored in the Session are assigned values of the corresponding ContactDetails object properties. Then a Entity Framework context is instantiated and the Customer object is added to the Customers DbSet. Calling SaveChanges() saves the data to the database. RemoveCustomer() is then called so as to remove the Session object. Finally, Success view is returned from the method.
Next, add four views - BasicDetails, AddressDetails, ContactDetails and Success. The markup of BasicDetails view is shown below:
@model WizardInMVC.Models.BasicDetails
@{
Layout = null;
}
<!DOCTYPE html>
<html>
<head>
<meta name="viewport" content="width=device-width" />
<title>BasicDetails</title>
</head>
<body>
@using (Html.BeginForm("BasicDetails", "Home", FormMethod.Post))
{
<h1>Step 1 : Basic Details</h1>
@Html.LabelFor(m=>m.CustomerID)<br />
@Html.TextBoxFor(m=>m.CustomerID)
@Html.ValidationMessageFor(m=>m.CustomerID)<br />
@Html.LabelFor(m=>m.CompanyName)<br />
@Html.TextBoxFor(m=>m.CompanyName)
@Html.ValidationMessageFor(m=>m.CompanyName)
<br />
<input type="submit" name="nextBtn" value='Next' />
}
</body>
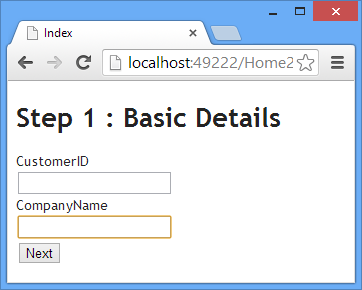
</html>As you can see BasicDetails view has its model set to BasicDetails class. The view renders a form using BeginForm() Html helper that posts to BasicDetails() action method of HomeController. Form fields for CustomerID and CompanyName are rendered using LabelFor() and TextBoxFor() helpers. The validation errors are emitted using ValidationMessageFor() helper. Note that the name of the Next button must match the corresponding parameter name of the BasicDetails() action method (nextBtn in this case). The following figure shows the BasicDetails view in action:
The AddressDetails view is similar to BasicDetails but has Previous button also. The markup of AddressDetails view is shown below:
@model WizardInMVC.Models.AddressDetails
@{
Layout = null;
}
<!DOCTYPE html>
<html>
<head>
<meta name="viewport" content="width=device-width" />
<title>AddressDetails</title>
</head>
<body>
@using (Html.BeginForm("AddressDetails", "Home", FormMethod.Post))
{
<h1>Step 2 : Address Details</h1>
@Html.LabelFor(m=>m.Address)<br />
@Html.TextBoxFor(m=>m.Address)
@Html.ValidationMessageFor(m=>m.Address)
<br />
@Html.LabelFor(m=>m.City)<br />
@Html.TextBoxFor(m=>m.City)
@Html.ValidationMessageFor(m=>m.City)
<br />
@Html.LabelFor(m=>m.Country)<br />
@Html.TextBoxFor(m=>m.Country)
@Html.ValidationMessageFor(m=>m.Country)
<br />
@Html.LabelFor(m=>m.PostalCode)<br />
@Html.TextBoxFor(m=>m.PostalCode)
@Html.ValidationMessageFor(m=>m.PostalCode)
<br />
<input type="submit" name="prevBtn" value='Previous' />
<input type="submit" name="nextBtn" value='Next' />
}
</body>
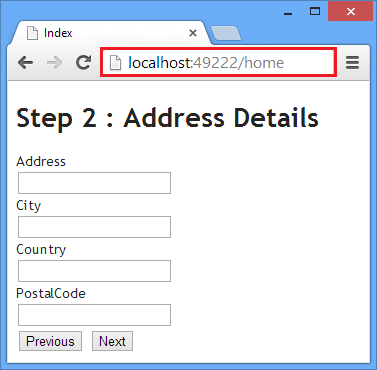
</html>AddressDetails view renders fields for Address, City, Country and PostalCode model properties. It also has prevBtn and nextBtn buttons that represent the Previous and Next button respectively. The AddressDetails view posts the form to AddressDetails() action method of HomeController. The following figure shows how AddressDetails view looks like along with validation errors.

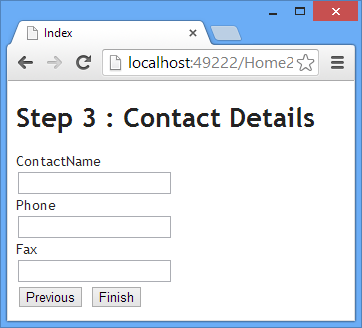
The final wizard step - ContactDetails - consists of form fields for ContactName, Phone and Fax. It has two buttons Previous and Finish. The markup of ContactDetails view is shown below:
@model WizardInMVC.Models.ContactDetails
@{
Layout = null;
}
<!DOCTYPE html>
<html>
<head>
<meta name="viewport" content="width=device-width" />
<title>ContactDetails</title>
</head>
<body>
@using (Html.BeginForm("ContactDetails", "Home", FormMethod.Post))
{
<h1>Step 3 : Contact Details</h1>
@Html.LabelFor(m=>m.ContactName)<br />
@Html.TextBoxFor(m=>m.ContactName)
@Html.ValidationMessageFor(m=>m.ContactName)
<br />
@Html.LabelFor(m=>m.Phone)<br />
@Html.TextBoxFor(m=>m.Phone)
@Html.ValidationMessageFor(m=>m.Phone)
<br />
@Html.LabelFor(m=>m.Fax)<br />
@Html.TextBoxFor(m=>m.Fax)
@Html.ValidationMessageFor(m=>m.Fax)
<br />
<input type="submit" name="prevBtn" value='Previous' />
<input type="submit" name="nextBtn" value='Finish' />
}
</body>
</html>As you can see the ContactDetails view posts to ContactDetails() action method of HomeController. Notice that this time nextBtn has a value of Finish since it is the last step of the wizard. The following figure shows ContactDetails in action:
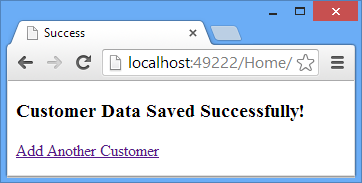
Finally, you need to add the Success view that displays a success method and has a link to run the wizard again. The markup of success view is shown below:
@{
Layout = null;
}
<!DOCTYPE html>
<html>
<head>
<meta name="viewport" content="width=device-width" />
<title>Success</title>
</head>
<body>
<h3>Customer Data Saved Successfully!</h3>
@Html.ActionLink("Add Another Customer","Index","Home")
</body>
</html>As you can see the ActionLink() helper renders an action link that points to the Index action method of HomeController. The following figure shows how the Success view looks like:
That's it! You can now run the wizard and test whether it works as expected. In the second part of this article you will learn to create a wizard using Ajax techniques.